I’ve talked about easy ways to tailor your clothes to make them fit better or make them feel more “you” and I’m at it again. This time it is the literal EASIEST tailoring job I’ve EVER done on a dress, so I wanted to share it with you all in case you have a dress or skirt sitting in your closet that would benefit from the same treatment.
The dress:
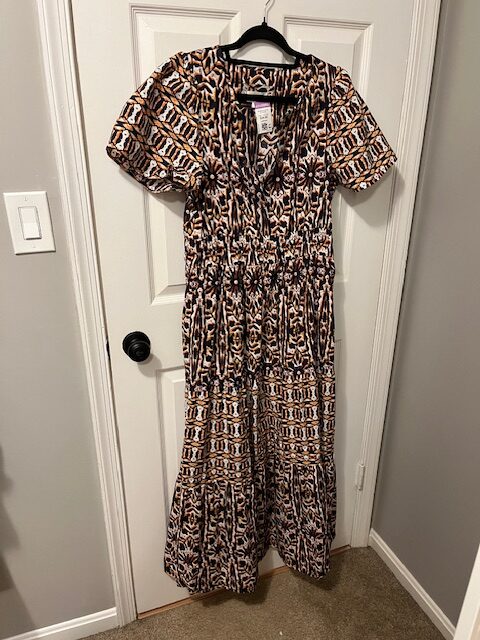
I was browsing the thrift store, saw the fabric of this dress from 15 feet away, and immediately clocked it as something from Anthropologie. Even better, it was my size and a style I recognized – the “Somerset” dress that I own in another colorway and love!
The only thing was that I didn’t really *need* a second Somerset maxi dress. So, I figured I’d hem it to more of a midi dress so that I could get more use out of it. And that is where I completely lucked out…
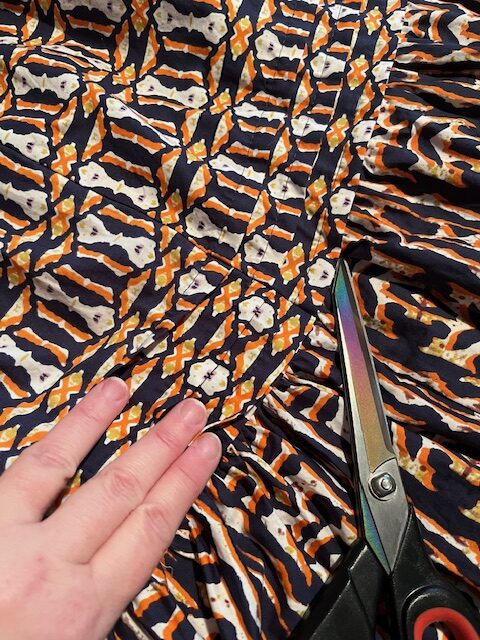
The bottom of the dress is tiered and has these pretty little folds above each tiered section. So all I had to do was carefully cut off the bottom tier, BEHIND the folds and save myself the trouble of getting out my sewing machine and hemming it!
That’s right, I JUST HAD TO CUT off a tier. No needle and thread. No sewing. NOTHING.
It took less than 5 minutes.
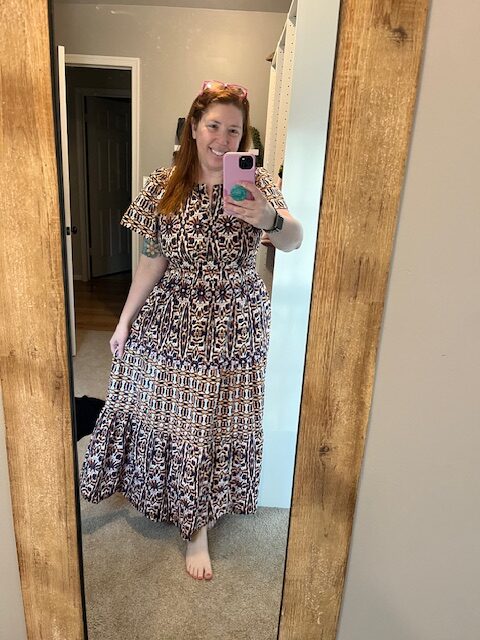
And BOOM. That’s it. Dress tailored in the easiest way possible. It was so easy, I woke up, decided to shorten it, cut the bottom off and wore it to work that day. That’s what we call an easy-peasy-lemon-squeezy moment, my friends!
Here’s the thing, there are TONS of tiered dresses and skirts out there. So if you have one in your closet that isn’t getting worn much because you’re not as into the ‘maxi’ length, give it a little chop-chop. Depending on how the tiers come together, you may get lucky and not even have to hem it at all. (If you MUST hem it and you can’t/don’t want to sew, you can always use this for a quick and easy hem: https://amzn.to/4s3Lkkc)
Oh and if you’d like to see a quick before/after video which gives a better look at the dress folds and the inside of the hem where I cut it, I made a Reel here:
Our laundry room has been kind of horrible since we moved in 14 years ago. I know, I know. How did we get by for FOURTEEN years without me doing something about it… especially when I’ve redone the nearby bathroom like 3-4 times? I don’t know, I guess I tried to just ignore it.
Which is kind of hard when I have a straight view into the washer and dryer from my favorite spot in the den. And I let the dogs out into the backyard with that door to the left multiple times a day. And I enter from the right door every time I come in from my garage. Anywhoo, I finally decided to just go for it and within a week, our laundry room had a glow up!
Here’s the before:
So yeah, it’s kind of a ‘hard working’ room.
The ugly brown walls were leftover from the last people who owned the house (I KNOW). When we moved in, I added the curtain and pictures from my ‘home decorating stash’ and they were okay, I guess. We also added the ‘stockroom’ portion which is what we call that food shelf and it is invaluable when we do our Costco/Sam’s Club shopping for extras.
My goal for the refresh was: lighter and brighter. I wanted it to feel clean and crisp and have better organization. I also didn’t want to spend a ton of money to do it and planned on doing every single thing 100% myself.
The plan: repaint the walls to something lighter, add tile to the back wall, and mount some shelves to give a natural spot to end the tile and start the upper wall paint. Also, clean out some unneeded stuff and add better organization options.
Things I already owned: 1 gallon of Behr “Greige” paint (leftover from when I did our living room and upstairs bathroom/walk-in closet), ceiling paint, white trim paint, white silicone caulk, command hook, wall mounted laundry drying rack, and assorted stuff for shelf décor.
First up, was cleanout time. I removed everything from the laundry room, dragged the washer and dryer away from the walls, and took down everything from the walls. I scrubbed the crap out of the gross laundry room sink too, which frankly has needed to be done for a while. Then, I spackled all the holes in the walls and let them dry for about a day before sanding the bejezzus out of them to get them nice and smooth.
Next, I grabbed some ceiling paint I had sitting around and painted the tops of all the walls. The person who painted previously was messy, so there was some brown on the edges and the ceiling – so in repainting with a new color, I wanted to make sure I’d have nice, crisp edges with no ugly brown lurking around.
Then, it was time to start the tile… which is quite fun and gives some immediate gratification of what it will look like when it’s done. I used a level and tape measure to make sure that everything was going to be perfectly straight and then I started peeling and sticking that tile on from wall to wall. I absolutely loved the tiles I picked and they were relatively easy to work with. For piecing the puzzle together, I would eyeball the sizing and then take a pair of hardy scissors and cut the thick plastic tiles to the correct size, making adjustments as needed. The edges (where the tile met the wall) didn’t need to be perfect since I was planning to caulk.
It took 2 coats of paint for nice coverage of the previous color. Once I was done painting the walls, I grabbed some trim paint and re-painted all the trim so it looked nice and fresh/white/clean again. Then, I caulked each side of the tile to give it a professional look.
Then it was the easy bits of hanging/re-hanging everything – up went the shelves, laundry drying rack, vacuum charger and pictures. Oh and if you’re wondering why I had to take down the laundry rack and vacuum charger, fill the holes and then re-mount them both… they had to move over a few inches to accommodate the new shelf.
Here’s the after:
If you’d prefer to see a compilation video, you can see it here:
I’m so happy with how it turned out! It just feels so much more bright and clean, and it is a much prettier view from my spot on the den couch. Of course, I’m kicking myself for not doing this year’s ago, but I’m quite satisfied with my less than a week of work (in my spare time, I have a day-job) and less than $300!
Disclosure: This post contains an Amazon affiliate links. This means that clicking on a link may help me earn a small commission at no cost to you.
Since shopping secondhand is my preferred way to shop, many times I’ll find something that’s close, but not exactly what I was looking for. Or maybe the fit and fabric are fabulous, but the color looks terrible on me. Through thrifting, I’ve learned to look at an item for what it can be, rather than what it currently is.
So, let’s take a look at two items I’ve recently personalized:
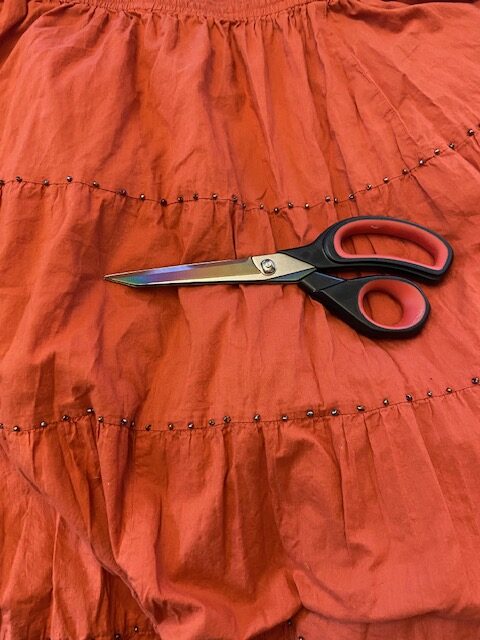
My Tiered Skirt Glow Up
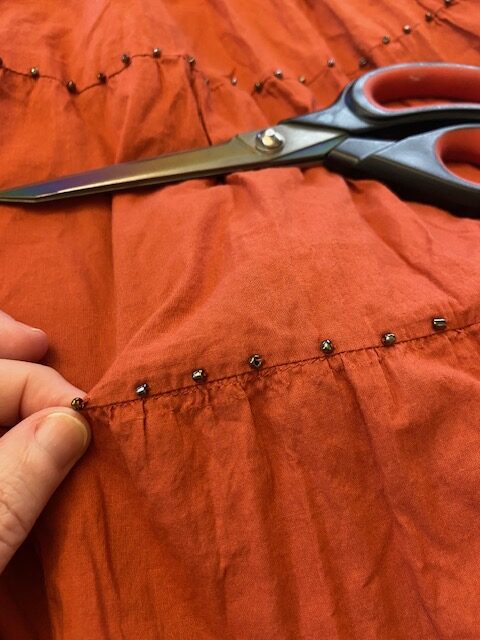
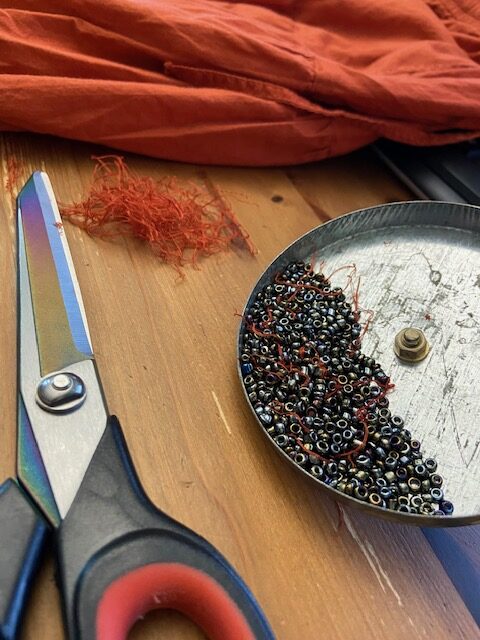
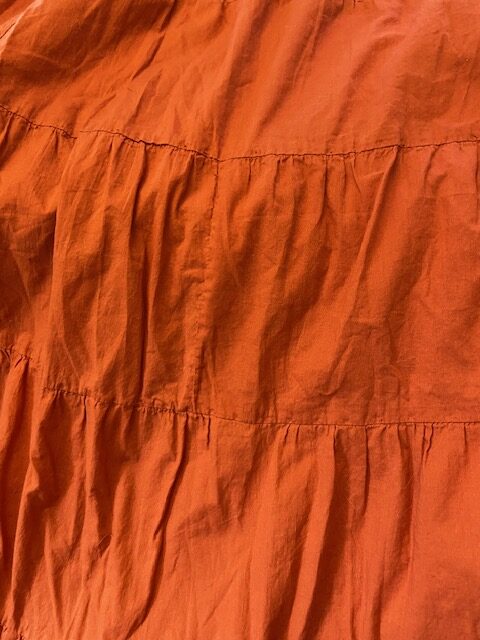
I bought this skirt off Poshmark recently because I loved the color, the shape and the swish factor. However, each of the three tiers was lined with accent beads. And to my eye, the beads just made the skirt look dated and cheap. I bought the skirt anyways, because I have free will… and a pair of scissors.
And I cut off Every. Single. Bead.
And yes, it felt like it took forever. But now it’s perfect and I love it so much!
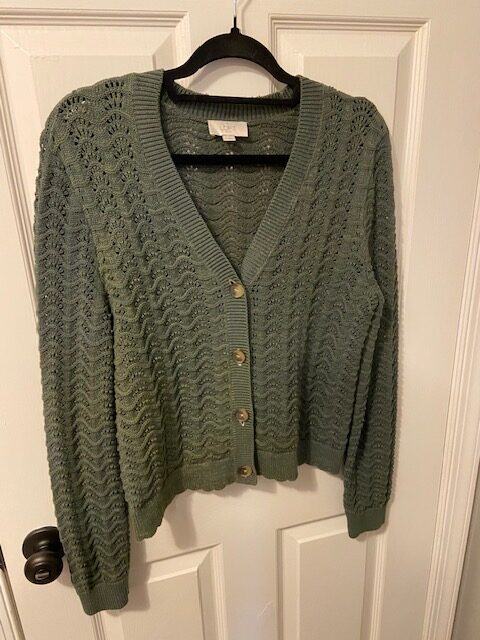
Cardigan Color Switcharoo
This is going to be shocking… but I actually bought this cardigan RETAIL at a Loft Outlet on the way home from Ocean City last summer. I really liked the 100% cotton, chunky stitches and cute cropped length. I tried to convince myself that I would grow to love the color or that it was exactly what my closet was missing. But it just didn’t work for me. The light brown felt like boring sweater oatmeal and it just didn’t look good with my coloring or play well with other items in my closet.
So, I grabbed a bottle of Rit dark green dye, spent about 40 minutes swishing the cardigan around, and BOOM it’s exactly what I was hoping for. A beautiful shade of green that I will actually wear:
The moral of the story? You don’t have to accept something exactly as it’s sold. If a piece is almost perfect, it’s okay to make it yours. Remove the beads. Chop the sleeves. Change the color. You bought it and you get to decide what works for you!