Our downstairs bathroom is the teeny-tiniest room in our house. In addition to being doll-sized, it’s the only bathroom on the first floor. So, it gets lots of use and is pretty much the only bathroom any guests see when visiting.
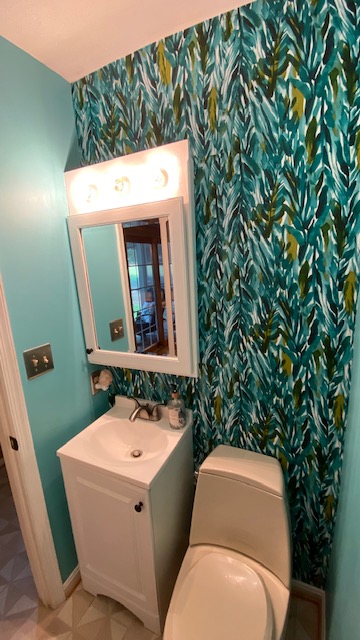
Over the years, it’s been painted various colors… partially because it is so small that you get a big dopamine hit by a quick change of a couple coats of paint. Back in January 2020, we switched out the silly pedestal sink that took up a ton of space with no storage for an 18” vanity. At that time, I also threw some white paint on the existing wood medicine cabinet/light combo to match the new vanity. It was ugly, but I didn’t feel like getting into a big mess with electrical wires.

Then, in September 2021, I added a wall of wallpaper because it accidentally jumped in my cart on a Target run. And this is how it’s mostly looked since then.

I started getting a little squirrely about it in the fall and decided it was time for yet another refresh. This time, I wanted something that felt more like the vibe in the rest of our house, and I wanted to finally rip the ugly medicine cabinet off the wall and replace it with a light and mirror. I also had the idea to get a GIANT mirror that took up a lot more horizonal space so that (1) my extra tall husband could actually see his face in it, and (2) it would help make the room feel bigger.
Here’s what I purchased for this project:
- Botanical Peel and Stick Wallpaper – $39.99 per roll (I purchased 3 rolls)
- 4-Light Bathroom Fixture – $47.99
- 40×30 inch Rounded Rectangle Mirror – $109.99
I also used from my stash – a paint brush, a paint roller, ceiling paint, trim paint and my wallpaper application tools (this $6 wallpaper kit has come in so, so, so handy for hanging wallpaper in 5 rooms over the past 5 years).
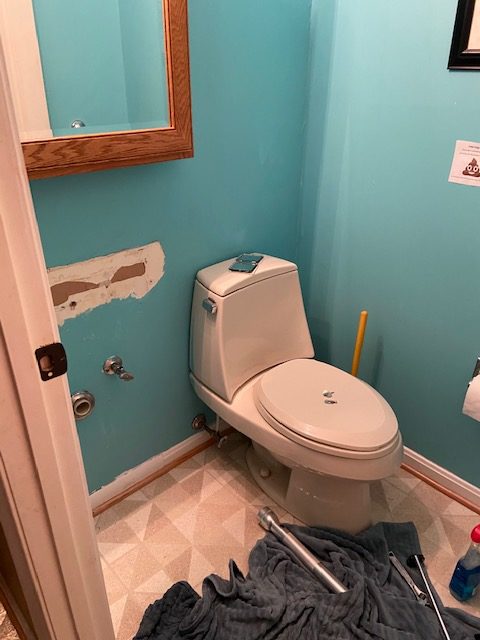
I started by tearing the old wallpaper off the wall and removing the towel bar and electrical plates. My husband helped me also rip the old medicine cabinet off the wall and it was surprisingly heavy.
Once it was off the wall, I taped out the size of the new mirror and we measured where the light would go. We made a hole in the wall with a hammer and then just fished the wires through the drywall to bring them out the new hole.


At this point, I had a mostly clean slate so I grabbed my can of white semi-gloss paint and gave the door and trim a fresh coat. Next, I used some ceiling paint I had on hand and freshened up the ceiling and the tops of the walls (I wanted to be sure to cover the blue). I also used the ceiling paint to paint over any of the drywall where the paper ripped off when removing the old wallpaper and medicine cabinet.
I let it all dry for about 24 hours and came in the next day with wallpaper.
A note on wallpaper… at this point I’ve used different brands of peel and stick wallpaper to do 5 different rooms (between my house and my sisters’ houses). I’ve used good wallpaper and crappy wallpaper. This wallpaper is actually really darn good – it’s a great weight and the right amount of sticky. Also, when it went up there were barely any air bubbles that needed to be smoothed out. However, this pattern WAS a bit difficult to line up. Part of the problem is that I’m a perfectionist and knew if something was misaligned it would bother me every time I used that bathroom.
So, I went slow and steady, reapplied a few sections, and after a few hours with lots of trash talk and creative cursing, it turned out amazing.
Once I was done with the wallpaper, Travis did 90% of the work to get the new light hung. Then, we added the mirror clips and had to wait a few days for the mirror to come in since the first one they sent arrived broken.

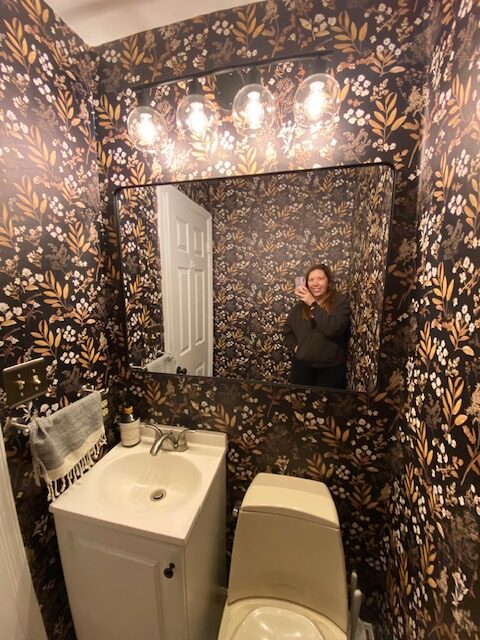
Honestly, the photos don’t do it justice. It’s like stepping into a fancy little jewel box and I love it so much. For less than $300 and about 1 weekend of work, it was a fun little DIY that made a great, big impact.