DIY: Studding a Denim Jacket

I think it’s pretty clear that I wish I was a Rockstar.

I mean, give me a pair of studded motorcycle boots, some dark denim and a microphone and I’m a happy girl! As it is, my day job is NOT being an actual Rockstar, so I do need to dress a little less Living on a Prayer and more Marketing Queen.

With that being said, I like to add a touch of fun to my clothing… so when I saw this sad denim jacket for just $8, I thought I could refurbish it a bit.

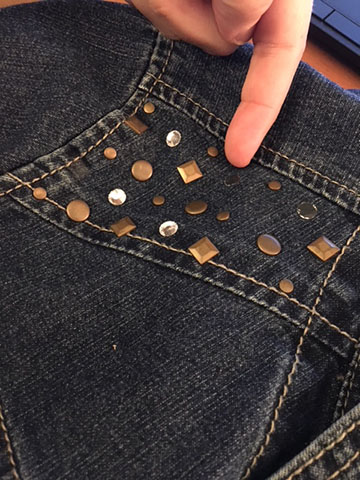
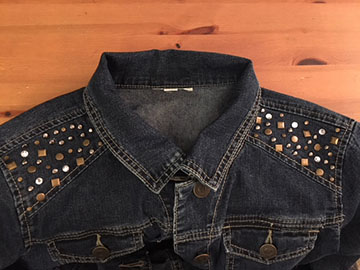
It already had some fun bedazzling going on the shoulder area, but it had lost some of it’s fun with just splotches of glue left behind.

First things first, I bought a pack of 100 black metal studs. I searched and searched Amazon for the exact kind I wanted – I didn’t want them to be too pointy, or too flat… I wanted the Goldilocks of metal studs. And I found them here: https://amzn.to/2NYfmph for just $6.

I used my pocketknife and scraped off the remaining glue, as well as ripped off any other loose bedazzled pieces. Then, I just started adding new black studs. They have four super stabby bits on the bottom of them, so I poked them through and then used my pocketknife to squish the pointy bits down.

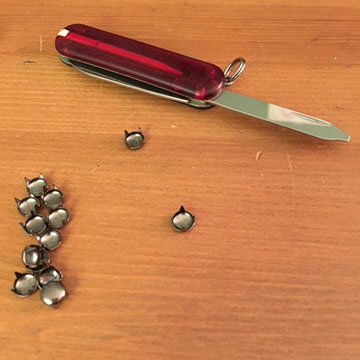
I’d then rub my finger over the squished inside to make sure that it wouldn’t catch on my clothing or stab me and did some extra squishing when necessary.

Then I kept going. And going. And going until I felt like I had enough studs on the jacket.

Here is my finished product:

And here it is on me:

I wore it to work last week and then left it at the office so I always have a topper to keep me warm on those chilly office days. I mean, a jean jacket looks good with basically every outfit… but a STUDDED jean jacket makes me feel like a marketing ROCKSTAR!

Disclaimer: This post contains an Amazon affiliate link. This means that clicking on a link may help me earn a small commission at no cost to you.

Dyeing a Sweater (and a Couple Tank Tops)

When I shared my July Thrift Haul, I showed you a pretty J. Jill wrap sweater that I had thrifted for $4. I loved the slouchy shape of the sweater but there were two things wrong with it: (1) it was pink and (2) I wouldn’t be able to wear it to work because it was just see-through enough that you could kinda see my arm tattoos.

I really liked the sweater through… and it was FOUR DOLLARS. So I thought I’d take a chance and try to dye it a different color!

I picked up this Rit Synthetic dye in Graphite because it is made specifically for polyester. I grabbed an old pot, filled it with water and stuck it on the stove until it started boiling. Then, I added the entire bottle of dye and a squirt of dish detergent. I stirred it a bit, wet my sweater in the sink and added it to my witches’ brew.

The directions told me to keep it near boiling and stir it consistently for 30 minutes, so that is exactly what I did. When the 30 minutes was up, I moved all my stuff over to my laundry sink (in case of staining) and pulled the sweater out while wearing a rubber glove (only one… because I have no idea where the other one went). I figured that throwing out the dye water at this point was kind of a waste, so I grabbed a couple tank tops that I didn’t love and added them in:

I let them sit for about 20 minutes and stirred every so often. Then I rinsed everything out and added all three tops to the washing machine for a bath (I added a towel to fill out the load a bit). I washed and dried the tank tops, but pulled the sweater out after the wash to let it hang dry.

And here are the finished results! First up, the wrap sweater:

This turned out a gorgeous shade of dark gray and is no longer transparent on the sleeves. Here is a close up so you can see the color a little better:

I LOOOOOOOVE how this turned out and I’m so glad I went ahead and dyed it!

Here are the bonus tank tops:

They both turned out dark gray, but the Bloom top has greenish/teal undertones. I hated that Sassy Lassy was white, so even though the text is much more muted now, I’m calling this an improvement. As for the Bloom Where You Are Top, I love the new color and how the text pops against the new dark background. I will absolutely wear both of these now instead of shoving them to the back of my dresser drawer.

It’s amazing the change a little dye bath can do to your clothes. Of course, now I’m looking through my closet to see what else I can update with a different color!

Do you personalize your clothes with dye?

Reviewing the HGTV DIY Across America Workshop at the AR Workshop

I love me some HGTV, so when my friend told me about an upcoming HGTV DIY Across America workshop I immediately signed up. The workshop was part of a partnership with AR Workshop Annapolis and Lindsey and I signed up to create our own plank wood signs.

We had tons of options to choose from, so I want for a “Welcome to the Firepit” sign which would incorporate my last name as well as the year that our family moved into our home. The cost for the event was $65.50 for the 17.5 x 24” plank sign and it covered all of the materials we would need for the day.

My thoughts were that the sign would be perfect for our new redesigned sunroom – we have a blank wall in need of decoration AND it even has a view of our outdoor firepit! Lindsey’s project was a personalized sign for her grandparent’s anniversary party.

Since it was a HGTV event, we also were gifted the opportunity to do a second project! I picked one with a map of the US and Lindsey picked a “Happiness is Homemade” sign. We also received gift bags which contained the latest copy of HGTV magazine, a tape measure and painters tape.

Oh… and there were cupcakes! And it was BYOB, so we both had bottles of wine!

Each station was all set up for us with wood, tools and the personalized stencils of our designs. There were four people total in this particular workshop and one workshop leader.

I’m not going to do a whole boring step-by-step tutorial, so here’s the short version: we picked our paint colors, sanded the boards, used a nail gun to make our pallet, stained them, did a dry brush treatment on top of the stain, cut out and attached the stencils, painted the letters, took the stencils off and did any touch-ups needed.

Since we were doing two projects, we would let one dry while working on the other and then switch back and forth until they were both done.

We had SO MUCH FUN with this workshop and I already started eyeing other projects that we can go back and make. We are both so happy with how our projects turned out… here are some close up pics:

There are lots of AR Workshops across the US, so check to see if there is a location near you here: https://www.arworkshop.com/workshop-locations/ I highly recommend grabbing a bottle of wine and checking them out!

Disclaimer: This is not a sponsored post. I paid for my workshop cost and the HGTV perks of the goodie bag and extra project were available for anyone who signed up!