Making over 2 Thrift Store Lamps

The better title for this post would have been: Making over 2 Thrift Store Lamps, Googling “Why doesn’t my lampshade fit my lamp”, “How do I make my lampshade fit my lamp”, “What the heck is a Slip Uno Adapter” and “How do I know what kind of fitter is on my lampshade”… then finally finding something at Home Depot to MAKE IT WORK Tim Gunn-style.

That might have been a teensy bit of overkill though…

It all started with these:

Thrift store lamps

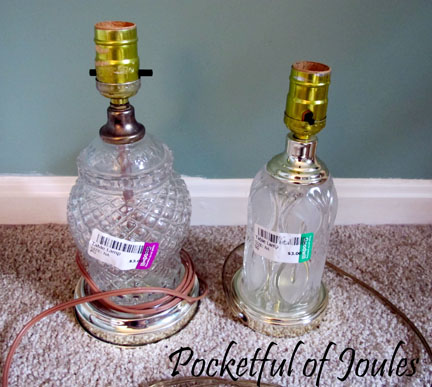
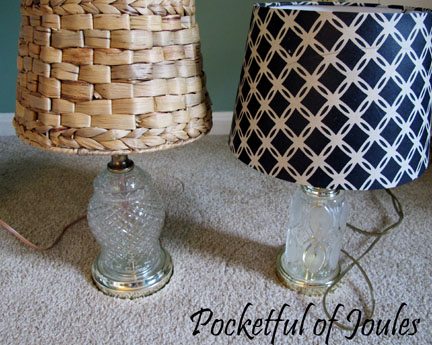
These two little crystal lamps were calling my name at the thrift store. They were marked at just $3.00 each and one was even on sale for half off! After I bought them, they just kind of sat around in my office while I did some online lamp shade shopping. I saw a few okay options at Target, but nothing that really seemed like the right design.

Then, on a trip to World Market I found these:

Lampshades from World Market

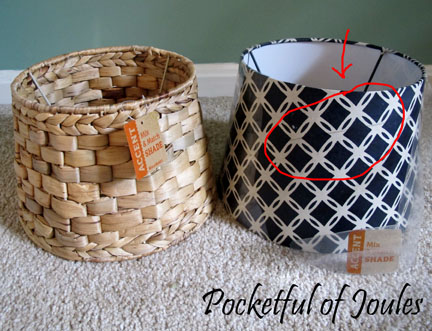
I didn’t have the bases with me, so I was just kind of crossing my fingers that they would work. Both of the shades were marked as $14.99; however the navy design one had a mark on it so I asked the manager for a discount. {Remember, the secret is to ask super nicely.} She was happy to reduce the price to $11.99 and then I used a coupon to get an extra 15% off of everything. So, the total for both shades was just under $23.00.

I was pretty excited when I got home and plopped the shades on the lamp bases… until:

Crooked lampshade

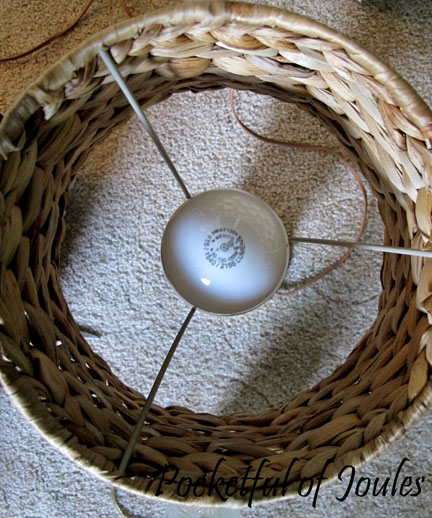
Well, crap. The lamp socket was too small for the lamp shade. Instead of the shade fitting snugly, it flopped around on top of the on/off switch… this won’t do at all!

At this point I did A LOT of googling around. I found this post on how to determine what fitter you need to be quite helpful. I also found this thing on Amazon, that SEEMED like it might fix the problem: Slip Uno Adapter Harp Converter Lamp Shade Uno Euro Fitter 1 7/16 I.D. Almost $8 each for a fitter seemed a bit steep though, so I did what I always do… I went to Home Depot and looked around.

The nice lady at the lamp section had no idea what I was talking about. Even when I pulled a full-sized lamp from my purse to show her.

{ I mean, why WOULDN’T I walk around with a lamp in my purse? It goes well with the blue crayon, 3 monster trucks and 2 baggies of snacks.}

I decided to just keep walking around to see if I could find anything circular that might fit on top of the lamp socket… and found this:

bushing

It’s a plumbing part called a PVC Bushing that seemed like it would fit nicely. I tried it on the base that I had with me and it seemed to do the job. Since they were only $1.26 each, I got a few of them to try at home with the shades.

Look, they’re like little lamp top hats!

top hats

They fit perfectly on the socket, leaving the on/off switch clear. They also allow the lampshade to balance on top, without flopping around. All you need to do is screw a bulb in and it holds everything together. The only drawback is that you can’t use a fancy energy-saving twirly bulb because the base is too thick to screw in through the bushing. Luckily a regular bulb works fine.

lamp with bulb

Check them out. Sassy, right?!

finished lamps

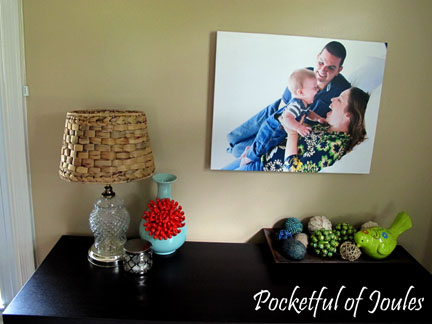
I already found the perfect space for my favorite one. I love the way the crystal looks with the rougher straw-like shade.

living room

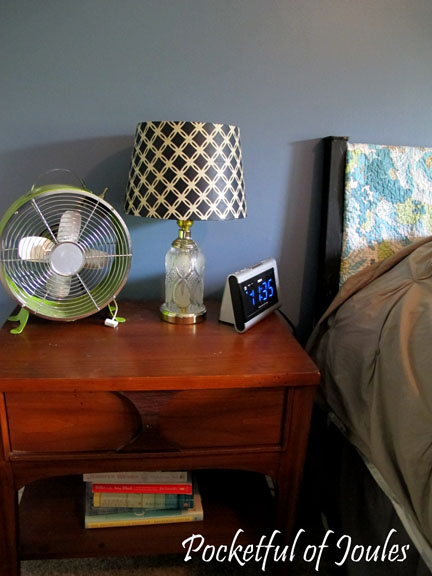
I think the other crystal lamp will end up on my bedside table. I don’t really NEED it there, because we have a remote control for our overhead fan/light. But it looks super cute, right?!

bedroom

Here’s what I spent:

Two lamps (Goodwill): $4.50
Two lampshades (World Market): $23.00
Two bushings (Home Depot): $2.52
Total: $30.02

I certainly could have found cheaper lamp shades at Walmart or the Dollar Store, but I think that the snazzy shades totally MAKE the lamps. It’s like a hard/soft thing going on that works in well with my home decor. They were definitely cheaper than this version of a crystal lamp/rough shade from Pottery Barn for $249 or this mini table lamp version from West Elm for $69. I’m pretty darn happy with my Cheapo-nista versions!

Have you gotten any cool stuff from the thrift store lately? Do you also have issues with lampshades fitting on your lamps? Which one is your favorite – the one with the woven shade or the blue patterned one?

Dog Proofing with a Staple Gun & Chicken Wire

For the last few weeks, Ollie has been driving me crazy. Every time I would let him out into the fenced-in area of our backyard to do his business, he would run under our sun room instead.

I think there might have been some bunny rabbits living under there, because one day a HUGE Ollie-sized rabbit came running out.

Hmmm… maybe they were making some sweet cross-species love?

DIY - Dog proofing porch - 1

Anyways, it got to the point where he didn’t want to do any business at all – other than hanging out in his hidden love shack. The tipping point was when we had a few days of rain… Ollie HATES baths and I hate having a muddy dog running around my house.

And it was quite muddy, because there wasn’t any grass under the porch. Or around the porch…

DIY - Dog proofing porch - 2

Instead of buying and installing some porch lattice, which is certainly one way of fixing the issue, we decided to work with what we had:

DIY - Dog proofing porch - 3

  • 1 inch Poultry Netting left over from another project
  • A staple gun and staples that I have used for pretty much EVERYTHING over the past 10 years
  • A measuring tape
  • A hammer (in case I needed to pry any staples out)
  • Wire snips (not shown)

Step 1: While Ollie kept a close eye on him, Travis pulled out the random slabs of concrete that were stuffed under the deck. We have no idea why the last owners put them there, but we re-purposed them to block the skinny area by the back stairs (shown a few pictures down).

Dog proofing porch - 4

Step 2: We measured each space between wood columns and snipped the chicken wire to size.

Dog proofing porch - 5

Step 3: While holding the wire tight, I used the staple gun to secure each piece to wood.

Dog proofing porch - 6

Step 4: Travis added a few extra staples to keep the wire from pulling away from the house.

Dog proofing porch - 7

That’s it! It took us less than an hour and totally solved the issue of Ollie playing under the deck. We even left the shallow area open, in case there were little critters that needed to get in and out of the area.

Dog proofing porch - 8

Dog proofing porch - 9

Unless you look closely, you can hardly tell that the chicken wire is there at all. Ollie knows though, and totally stares through the holes with longing at his bunny wife. Or husband. I’m not really sure of Ollie’s sexual orientation.

Dog proofing porch - 10

I guess now we need to deal with the whole lack o’ grass thing going on…

Have you needed to do some random animal proofing around your house? Do you have a dog in love with a bunny rabbit?

How to Keep Your Wrap Dress from Being a Peep Show

I went to Nordstrom Rack and found this Maggy London wrap dress marked way down to just $35. I couldn’t resist it! The colors were pretty, the price was right and the fit was great, except for one little thing…

IMG_4049

BOOBS!
Right?!

Wrap dresses are super flattering, especially for us curvy girls with boobs and hips. However, they also fly open like they’re advertising your goodies for sale.

Yes, you can always throw a camisole on underneath your dress, but when it’s 95 degrees and humid the last thing you want is another layer of clothing. So you can do one of two things, strategically keep your hand over your cleavage or just yank that baby back together when nobody is looking (you hope).

How to Keep Your Wrap Dress from Being a Peep Show

As attractive as those options tend to be (obviously), they are not really a great long term solution. Which brings me to the point of today’s post: a super easy way to fix your wrap dress for less than $5.

And no, the answer is not to use a safety pin. {However, if you MUST use a safety pin, use one of these  — it’s an assorted set of black and white pins so that they don’t catch the sun and glint… catching everyone’s attention!}

Before you start, go out and buy something like this:

snaps

You can get sew-on snaps at your local Joann’s or online. Here’s a set on Amazon.com for just $3. And before you tell me what a horrible sewer you are, let me say that ANYONE can do this. I wouldn’t consider myself a good sewer, just a randomly capable person who can figure stuff out logically. If I can do this, you can do this!

Step 1: Put your dress on and use a safety pin to hold the top together just a smidge below where you’d like it to fall. Take the dress off over your head, keeping the safety pin attached to the dress.

step 1

 Step 2: Leave the safety pin in your dress. Take the pokey end of a snap (I used the largest one in the package) and sew it onto the side of the dress that will lay closest to your skin. Try to use thread that will blend into your dress; however if you don’t have matching thread just keep the sewing on the folded over area of the seam. Then, you won’t be able to see it come out the other side.

step 2

 Step 3: STILL leave the safety pin in your dress. Line up the unsewn side of the snap with the one that is now sewn onto your dress and attach above the safety pin. Once again, be sure to keep your sewing on the flap so that your thread won’t be seen through the fabric.

step 3

Step 4: Once both sides of the snap are sewn on, make sure they line up and snap together. NOW you can remove the safety pin.

step 4

Step 5: Look the safety pin is out and the dress is snapped together!

step 5

You’re done! All that’s left to do is for you to try your dress on again and marvel about the fact that you no longer showing off your bra.

Wrap Dress tips - Pocketful of Joules

And if you’re wondering what that cord is in the picture, I’m trying out a remote camera shutter and I’m kind of loving it! I’m also loving my new wrap dress, which is why it will be going to BlogHer with me this week.

Are you a fan of wrap dresses? Do you go the camisole route, or just stick a safety pin through the fabric and pretend to ignore the shiny gleam that peeks through?


Disclaimer: This post contains an Amazon Associates link. This means that clicking on a link may help me earn a small commission at no cost to you.