Reviewing Darby Smart & Darby Girl

WHEW, it HAS been a super crafty week here at Pocketful of Joules! I’m kind of exhausted from the craftiness…

I actually received these boxes from Darby Smart the week of Christmas and they’ve been sitting there silently judging me for weeks. With Jack running around the house, I couldn’t exactly break out the fabric paint and go to town, right?

The Marquee Sign Box
The first box I received is the grown-up version, the Darby Smart box for making your own marquee sign. Marquee signs are HUGE right now – you can find DIY versions all over Pinterest – so I was pretty excited to see a kit that included everything I needed to make one.

Included in the kit:

  • Awl (not an owl… an awl, which is a pokey knife thingie)
  • Metallic pen
  • LED lights
  • Oversized alphabet stencils
  • 2 foam boards (one for practice)

I actually got two of these kits, so I gave one to my sister. Kelsey is about to graduate from James Madison University (JMU) with a BS in Nursing AND a BS in Kinesiology (what can I say, we are a family of overachievers!), so she decided to do a special JMU pride marquee sign:

darby kelseySuper cute, right? I’ve been debating on what to do for my marquee. I’m torn between doing it Christmas themed (maybe “Joy”), one for Jack’s room (“JACK”) or one to go on one of our gallery walls (“Love”)… but right now I’m kind of stuck in indecision. OOOH, or I could do one for my office that simply says “WORK” or maybe even “WERK” to keep it sassy…

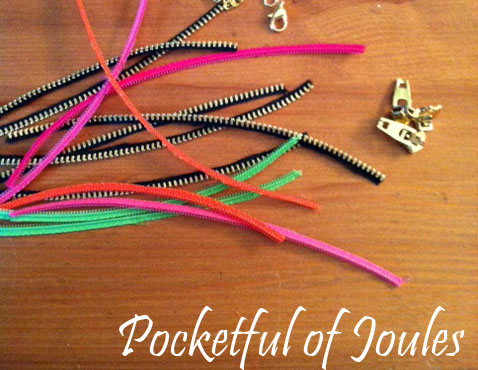
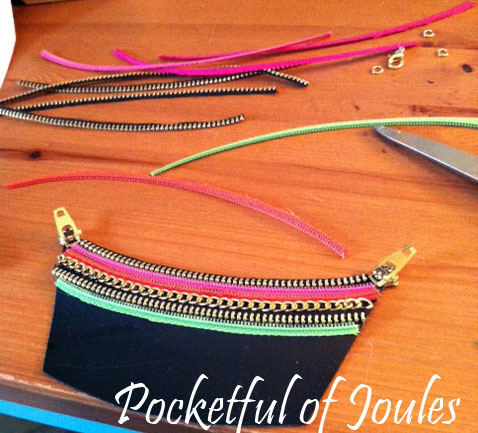
The “Let’s Get Framed” Box
Darby Smart recently launched, Darby Girl, a craft club for teens. You can purchase a box for one month, six months (3 boxes) or one year (6 boxes) and boxes start at $16. This is a really cool gift for a teen or tween in your life who loves to craft… and reasonably priced too!

The box I received was the “Let’s Get Framed” box, which contains everything you need to make mini bulletin boards.

Included in this kit:

  • 2 fabric dyes
  • Stretchy elastic
  • Fabric
  • Cork tiles
  • E6000 glue
  • Beads in a Bottle (which is like old-school puffy paint)

I’m going to be honest… I still haven’t found time to do this kit. I know, BAD blogger! But the kit is really designed for a teen, so it seems silly to do the kit and then just have it sitting around the house. So, here’s the deal – if you have a teen or tween that would love to do this kit, leave me a comment below. I’ll pick someone and send the kit to you to enjoy!

With just a little work, THIS is what you could end up with:

darby girl - samplesThere are also some really cool examples in the Darby Smart Showroom. So check them out and see what other people came up with!

Today’s post marks the end of my craftinista week. Although I don’t typically do “theme” weeks on the blog, this was kind of fun! In fact, I’m kind of accidently continuing the theme thing next week, but instead of being DIY projects, it’s going to be all about fashion because I just had an AWESOME Twice order delivered and I will be receiving my January Stitch Fix box too.

Tell me, do you like the “theme” week thing or do you prefer I just write about whatever strikes me each particular day? Would your teen/tween like the Darby Girl box? Let me know in the comments!

1/13/14 Update: Okay, I just wrote names on pieces of paper and made my dog pick one with his nose… The winner is: Ryan Richael! I’ll be emailing you directly to get your mailing address so I can pop this in the mail for your daughter!

Like what you see? Share me with your friends!

Brit Kit: A Necklace Made out of Zippers?!

For my third craftinista* post of the week, Brit + Co sent me this fabulous Brit Kit to make your very own zipper necklace.

That’s right… a necklace made out of zippers. It sounds incredibly weird and honestly the directions intimidated the crap out of me. But I thought that if my finished necklace turned out even half as cute as the one that Brit is wearing on the website, it would be worth the time I spent on it.

Here’s what came in the kit: 3 black zippers, 4 colored zippers, gold findings, glue, 3-in-1 pliers, black backing and the instructions.

Here’s how the project went:

Brit Kit zipper necklace - suppliesThe kit supplies. Are you kidding me with this? I’m supposed to make a necklace out of THIS?!

Brit Kit zipper necklace - cut zipsOk, I cut the extra fabric off the zippers.This is do-able so far…

Brit Kit zipper necklace - first strand gluedThen I glued the zipper tabs on each end and glued on my first zipper. Not too hard…

Brit Kit zipper necklace - halfway doneMore gluing. I’m actually doing a pretty good job!

Brit Kit zipper necklace - finished necklaceHoly guacamole, I just MADE this out of zippers!

Impressive, right? Who would have ever thought that I’d end up with something so sassy when I started with a desk full of zippers?! If you’re interested in this kit for yourself or a fashionable friend, it’s available on Brit + Co’s website for $24.99.

Would you like to win this necklace? I’ve decided to give away this zipper necklace, as well as the Joan of Arc necklace I made in this post. All you have to do is leave a comment and tell me which necklace you’d like to win! I’ll draw the winners on Wednesday, January 15th at noon.

Disclosure: I was provided a Brit Kit for free as a ‘thank you’ for participating in the Brit Co-Op. I was not required to review the kit, recommend it or even blog about it at all. I just loved it so much that I wanted to share it with my readers!

* If TJ Maxx can call someone a Maxxinista… I can certainly call myself a craftinista!

1/15/14 Update: Winners have been picked and I’m thrilled to announce that Erika has won the zipper necklace and Cathy C has won the Joan of Arc necklace! Emails will be going out to the winners today so that I can pop your prizes in the mail by the end of the week. Thank you to everyone who entered and keep your eyes pealed for more fun contests and giveaways in the near future.

Like what you see? Share me with your friends!

A Toddler Pillow to Make EVERYONE Happy

Today is part two in my mini-craftinista* series and it starts with a little story…

Have you heard of sleep regression? Apparently it’s a wonderful time in a child’s life where after months of going right to sleep and sleeping through the night, suddenly they don’t like to sleep anymore.

For Jack, this happened a few weeks ago – after sleeping like a champ we had to coax him into bed with a tiring combination of reading, rocking, milk in a sippie cup, snuggling with mommy, snugging with daddy and some more rocking. He even ended up in bed with us for a couple nights, only to be kicked out when he kept KICKING ME in the back all night long. I mean, I’ll take that crap from an 8 pound rescue dog… but NOT a 30 pound little man!

It was exhausting.

Which is funny because JACK was exhausted and just would NOT go to sleep.

So in a fit of brilliance (or just overtired madness) I told Jack that I had a SPECIAL pillow only for Big Boys to use. This SPECIAL pillow would go into his crib, but ONLY if he was a Big Boy who would lay down on it and go to sleep.

Can you believe that this worked?

Suddenly Jack stopped fighting sleep and would go right into his crib to lie on his special Big Boy pillow.

I’m a genius. A parenting genius.

Send your checks today to get your very own SPECIAL Big Boy pillow. Also available in Big Girl…

Just kidding. The secret is that I grabbed the closest pillow I could find, which was an old accent pillow that I had made for our couch ages ago. After living on the couch for a while, it somehow ended up in Jack’s room on his rocking chair. It was so well-worn that it’s quite flat… which makes it perfect for Jack since he can’t smother himself on it.

After Jack slept on it contently for a couple weeks, I figured I should make a pillow case for it so that I can keep it clean. So I grabbed an old pillowcase that we’ve probably used for 10 years or so and made it fit:

Toddler-pillow-before-updatedCheck this out… it’s a magical pillow. Which is actually just a pillow I made a bunch of years ago from an old pillow case from Crate & Barrel.

First, I stuck the throw pillow in our old pillowcase and pinned around it with straight pins. I pulled it in and out a couple times to make sure that it wasn't too snug.First, I stuck the throw pillow in our old pillowcase and pinned around it with straight pins. I pulled it in and out a couple times to make sure that it wasn’t too snug.

I then removed the throw from the case and stitched around all three sides, removing the pins as I went so that I wouldn't stab myself and yell out bad words.I then removed the throw from the case and stitched around all three sides, removing the pins as I went so that I wouldn’t stab myself and yell out bad words.

Once I finished sewing, I cut off the extra fabric. You can use normal scissors or be all fancy like me with my pinking shears. Is it weird that I have no idea how pinking shears came to live in my house?

The finished magical SPECIAL Big Boy pillow. Mr. Bunny Rabbit approves.

Super cute, right?! And basically free.

And the best part is that I can sleep again!

* If TJ Maxx can call someone a Maxxinista… I can certainly call myself a craftinista!

Like what you see? Share me with your friends!