Learning from Pinterest: Boots + Jeans

I was always a bootcut jeans girl, so figuring out how to wear boots with my jeans was pretty darn easy. Put on jeans + stick boots under jeans = done. Easy peasy.

Over the past year, I’ve started liking more of the straight and skinny jeans styles. In the summer, it’s pretty easy to style them with Toms, flats or sandals… but once the weather started getting cold I was kind of at a loss.

Most of my jeans weren’t super tight at the ankles, so shoving them into the tops of my boots looked kind of odd to me. If I rolled them up, that looked kind of weird too. I know that other people seemed to figure this out easily, so I’m not really sure what my issue was.

So I did what every lady does in 2014… I checked Pinterest. You can check out my Wearing Jeans + Boots board here.

It seemed like there were three main ways of dealing with things:
1. Shoving the pants inside the boot.
2. Cuffing the jeans above the boot.
3. Wearing boot socks.

In the name of science, I decided to try them all out. I mean, I might as well do the work so you don’t have to, right?

Here are the pants I was working with: Kayla Skinny Jeans in Red (from this Stitch Fix post), Kate Spade Broom St Grey Denim Skinny Jeans (Nordstrom Rack), Kut from the Cloth Toothpick Skinny Jeans (Nordstrom Rack), and Kensie Sophia Distressed Jeans (from this Stitch Fix post).

I picked these four pairs of pants because they get the most wear out of my closet. The Kensie jeans are pretty tight at the ankle, which makes them easier to manipulate into boots, but the others are more of a straight bottom which can make things awkward.

Here are my favorite boots that I’ll be using to try each style:

boots - Pocketful of Joules

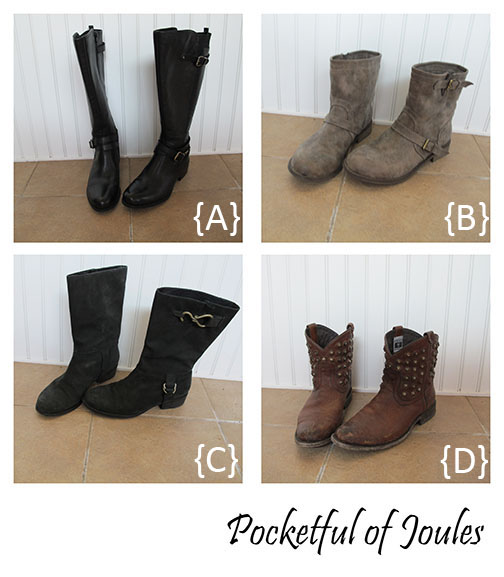
A. Naturalizer Jovana boot – a pretty typical knee-high version.
B. Nine West short boot – a bit shorter, which can make them hard to style.
C. Cole Haan Air Tantivy boot – a medium height, which can be awkward.
D. Frye Wyatt Disk short boot – more of a “bootie” look.

Why yes, that is a pair of FRYES in my boot list! After I lucked out in Austin last week I went ahead and clicked ‘buy it now’ on a pair I was stalking on eBay. They go for $350 new, but I got them for $99! YAY for being patient and stalking shoes online!

Style #1: Shoving the pants inside the boot.
So when I first thought of how to throw on a pair of boots with skinny jeans, I figured I’d just shove those bad boys in there. In order to keep them inside the boots, there are a few Pinterest tips that can help: you can do a small roll of your jeans and then shove that into the boot, you can tuck your jeans into your short socks, or you can buy little straps that connect to your jean cuffs and go under your foot to hold them tight.

Style one - shoving the pants inside the boots.

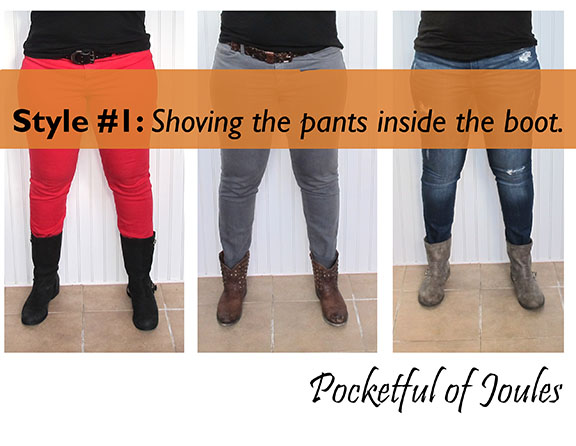
So this style seems to depend on the pants and the boot height. For the first picture it’s working with the mid-height Cole Haan boots, but looks a little stumpy. I think that the higher knee-high boots would look much more flattering. The grey jeans are not very tight at the bottom, so they look a bit sloppy stuffed into the Fryes. As for the distressed jeans and grey Nine West boots, this is how I typically wear them. Since they are pretty fitted at the ankle, it’s easy to stuff them inside the boot.

Style #2: Cuffing the jeans above the boot.
It seems that many people deal with the weird shoving the jeans in the boot issue by cuffing their jeans above their boots, showing off either skin or cute socks. Here’s an example pin with socks and one without socks.

Style two - cuffing jeans above boot

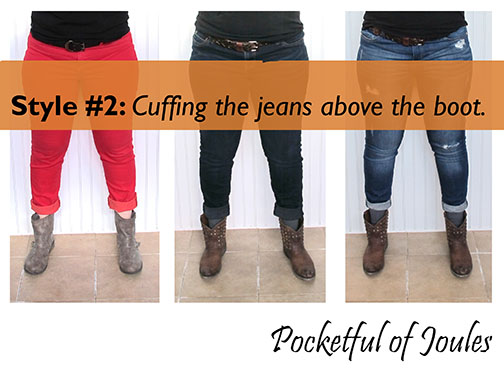
Ok, the red jeans are a mess. They are just too baggy to cuff above the boot and it looks pretty ridiculous. I’m also not loving the dark blue jeans cuffed — it’s not terrible and I’d probably leave the house like this, but something about the bulkiness of the cuff isn’t doing it for me. The only one that’s really working for me is the skinny distressed jeans. I actually like the look of the cuff with a pair of neutral socks peeking out.

Style #3: Wearing boot socks.
Apparently boot socks are all the rage and you can totally buy them at department stores, specialty stores and on etsy. Or, you can make your own using thrift store sweaters or old socks. I bought a couple $3 sweaters from my local Goodwill to try this out myself.

Style three - wearing boot socks

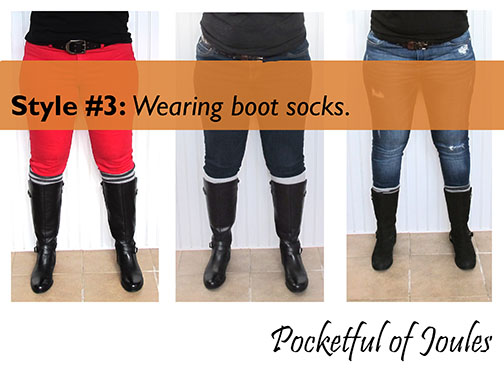
Now this is a style I can totally get behind, because it seems to work well with my tall boots and my medium-height boots. All I did was take a couple sweaters and cut the sleeves off! The boot socks do double duty of keeping my legs extra warm and also looking pretty darn cute. I’m thinking a sparkly sweater cuff could look snazzy peeking out for the holidays. Or, you could sew on a pretty button or pin on a jeweled broach. A little tip, when you’re buying thrift sweaters to use… go for a medium or a large. Both of the ones I bought were size small and I think the cream pair would look better if they weren’t stretched so tight.

I’m really glad I tried this little exercise because it helped me figure out how to mix and match boots and pants from my own closet, without going on a shopping spree for jeans with tighter ankles. So, get used to seeing me in lots of jeans and boots this winter!

Am I the only one who had issues with the whole boots and jeans combo? Did you find my examples helpful at all? Do you have a boots + jeans tip I should try?

A Bathroom Mini Disaster: Ignoring it Didn’t Work

You know how sometimes you see something and you think, “OH CRAP… that’s going to be a pain in my butt” so you ignore it for a while?

Well, don’t do that when it comes to bathroom leaking stuff.
Really. Don’t.

One day while scrub-a-dub-dub-ing in the shower, I looked up and saw that the area of paint right above the shower insert was kind of bubbling. I don’t know if this is the first day it happened, or the fact that I actually had my contacts in and could SEE that made me notice it.

I was about to leave for a work conference the next day though, so I figured I’d just ignore it and deal with it when I came back. But I was busy when I got back too. And then, I tried to convince myself that it wasn’t really THAT big of a deal and I should probably just NOT wear my contacts while taking a shower.

That also helps with shower cleaning impulses. FYI.

So, I ignored it.
For a couple months.

bathroom paint bubbling

I had almost convinced myself that the bubbling was because the fan wasn’t working properly and there was just a bit too much moisture in the room. No big deal. The wall wasn’t spongy at all, so it’s not like water was seeping into it.

Then, one day while cleaning the shower I reached up and pressed my pointer finger into the wall. And it felt like soggy bread.

Crap.
NOW, I have to do something about it!

So I did something. I called my dad in a panic and he came over that night. {For those who don’t know or forgot, my dad builds and renovates houses for a living, so he’s kind of the perfect dad to call in these circumstances.}

Upon entering my shower, my dad stuck his hand into the wall and ripped out a big chunk of soggy drywall. Yup, with his BARE HANDS. It was like superman all up in the joint.

After ripping away the wall, he could tell that the shower head was leaking and spraying right at the bubbly wall. Luckily, the spray was quite light so it didn’t completely drench the inside of the entire wall and make mold. He continued ripping pieces out until it was firm again, and then ripped a little more just to make sure. He also used his razor blade to scrap away any damp paint and drywall around the entire top and side of the shower insert where the water was pooling and dripping off.

bathroom - measuring the hole

At this point, we jumped in my truck for a quickie trip to Home Depot to buy: a new shower head and shower head arm, Teflon tape, a piece of drywall, and spackle. All in all, it was right about $60.

When we got back home, Superdad replaced the old leaky shower head arm with a new one that didn’t leak (the Teflon tape was used to make sure it was totally watertight). He then used his razor to cut the wall into straight edges so he could insert the new piece of drywall.

bathroom - hole

After nailing the new piece of drywall into place, he applied three coats of quickset spackle. He was like a spackling machine getting it up there so much smoother than I could ever hope to do. At this point it was past 10:00 at night and my dad tagged out to go home (and sleep so he could wake up bright and early the next day to go work some more). THANK YOU DAD! {Not that he reads my blog, but my mom will probably tell him I wrote about him…}

I let the spackle dry completely for a few days and then went in to do a super light sanding with a sanding block I had sitting around. Once the wall was as smooth as possible, I applied a coat of Kilz primer over all the newly spackled parts. I also used some nail filler to quickly fill any extra nail holes (and sanded and primed those areas too), since I had the supplies out.

bathroom - sand and nail hole patch

I actually had about 3/4 can of gray semi-gloss paint left over from our kitchen, so I didn’t bother buying anything else and did two coats on the whole bathroom.

bathroom - new paint

I let it dry for a few hours and returned everything back to its proper place. I wouldn’t say it’s a big REVEAL makeover moment, but at least there are no longer any leaks! Also, I think the gray looks pretty with my snazzy West Elm shower curtain.

bathroom - finished

If I would have just dealt with the issue when it first appeared, we probably could have replaced a much smaller area of drywall instead of ripping out a huge hole and scraping along the entire top and side of the shower insert. We also got really lucky that a ton of mold wasn’t inside the wall when we opened it up.

Learn from my mistakes, don’t ignore bathroom leaking issues!

We were without a master bathroom shower for about a week and Jack was NOT pleased that our stuff was junking up his bathtub. He even told me that “Momma really needs to clean” a couple times. So yeah, that’s always nice.

Am I the only one who thought ignoring the problem was a great plan of attack? Have you ever ripped out chunks of a wall with your bare hands? Do you have a Superdad? If so feel free to share adorable dad stories in the comments so I can get all teary-eyed and go “Awww!”


Brit Co-Op: Food + Wine + DIY

Do you remember way back over a year ago when I talked about being part of the Brit + Co Co-Op? Well, the Co-Op took a little break but came back a couple weeks ago with a bang.

Or maybe a tick tock.

That was my clever way of hinting that we created our own watch bands.

Get it.
Tick, tock.

{insert dorky snort laugh here}

Whatever. It was totally funny in my head. Anyways, I LOVE a chance to kick the boys out of the house and invite some of my girlfriends over to play. As always, I threw together some snacks and chilled a few bottles of wine because WINE makes all DIY projects more fun.

This month’s project was a Timex embroidered watch set that came in both orange and lime green:

Brit Kit for Timex Watches

They provided everything in the Brit Kit, except for scissors:
– Timex Weekender Watch
– embroidery thread in 3 colors
– embroidery needles

Even though some of my friends were craftier than others – most noticeable when we all started trying to thread our needles – I think all the watches turned out super cute. Check them out:

girlfriends

Working on our watches

Timex watches from Brit and Co

I felt like we totally need a “Go, Go Power Rangers picture…” And this one is even more awesome because it has an adorable baby photobomb!

Timex watches


They turned out super cute, right?

Do you want to make one at home? I have a lime green watch kit that I’d love to give away to one of you to enjoy! All you have to do is leave me a comment on this post and tell me what accessory you just can’t live without. I’ll pick a winner at random (or perhaps Ollie will do the picking…) on Monday, September 15th.

9/15/14 Update: The winner of the lime green Timex kit from Brit+Co is… Stacey, who can’t leave the house without her glasses. TeeHee. Congrats Stacey and thank you to everyone who entered!


Disclosure: Brit + Co provided me with the Brit Kits for free. I was not required to review the kits or even write a blog post about the party. I just wanted to because we had so much fun and I could see this being a cool idea for a bridal shower, baby shower or birthday.