My Recent Visible Mending Project

As I’ve moved more towards thrifting and slow fashion, I’ve also started appreciating the idea of visible mending to give worn clothes a longer life. For those of you who are new to the term ‘visible mending’ it is simply a way of mending your clothing where it is done in an eye-catching and creative way, rather than trying to blend in.

Examples could be embroidering over a hole in a sweater, running stitches in a bright color across an area that is wearing through, or what I did… adding colorful patches.

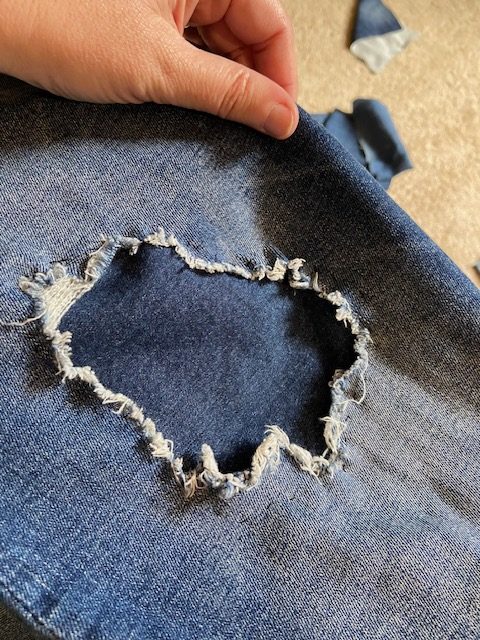
In my case, I have a favorite pair of jeans that fit so comfortably. But what was once a distressed look has now turned into a holey look. It got to the point that I had to be extra careful when shoving my foot into the leg hole, because I might just rip it through the knee-hole that had widened and widened.

This little project was SUPER easy and I’m very happy with how it came out, so I wanted to share it with you all!

First up, I stopped by the thrift store and found three cute denim items in the kid’s section in different prints for $6.25 total:

I also had a couple pairs of Jack’s old jeans that I had saved for future mending projects. I cut the items down into random patch sizes, getting rid of all the seams. In addition to the patches, I used a needle, navy thread, pins, and a pair of good sewing scissors.

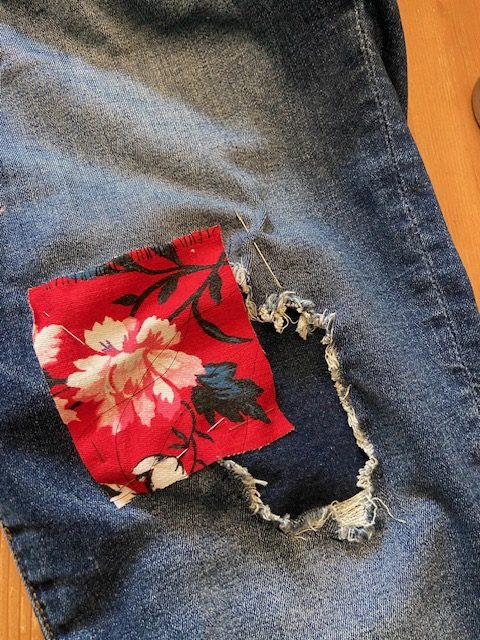
Once I had all my materials ready, I cut all the random strings off the hole in my jeans, and placed one denim patch INSIDE the jeans.

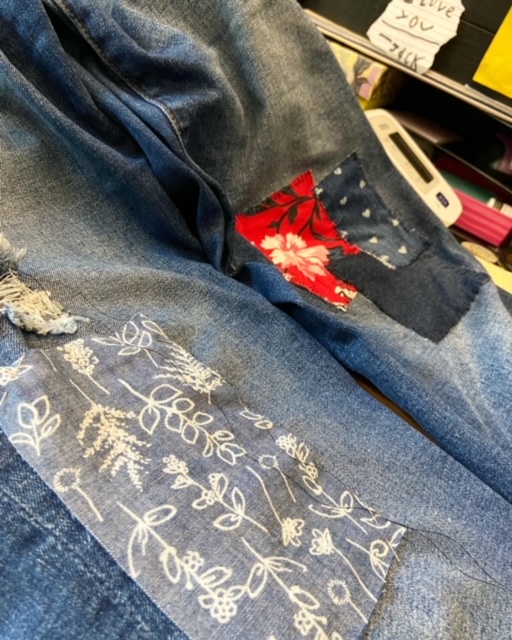
I turned the jean’s leg inside-out and sewed that on by hand. Then, I played with various sizes and combinations of the fun-patterned patches until I found a combo I liked. I sewed them on one at a time, with navy blue thread.

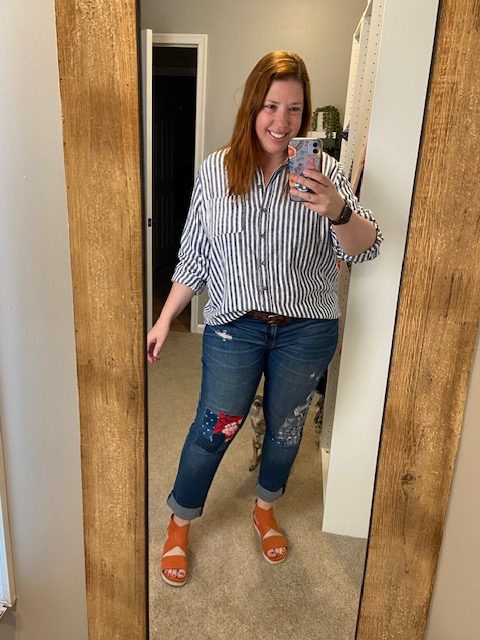
Once I had the one side done, the other side looked a little plain. So, I added one more patch on top of a worn area. They weren’t worn all the way through into a hole, so I didn’t bother with a patch on the inside. I’ve been wearing them for the past month and I love that I gave my old jeans a new life!

If you’re looking for a way to add a little extra pizazz to your worn clothes, I think visible mending is a really fun way to do it!

Organizing Love: Some Recent Purchases That Make My Heart Happy

If you follow me on Instagram, you know that we are in the middle of a bit of a bedroom redo with a new bed, bed frame, headboard, and all the bedding. I’ll be sharing more about that soon, but in the meantime, I’ve also been doing a little home organization. I guess it’s the ‘spring cleaning’ bug, because I’ve had the urge to clean and purge and put nicely labeled tags on things.

So, let’s look at two things I bought and love… and one that I HATED:

LOVED: HomeHacks Storage 3-Pack of Storage Bags: https://amzn.to/42dsgmB

Source: Amazon.com

These are currently $11.99 for a 3-pack of organizers and they are fantastic. I was cleaning out all our older bedding out of Jack’s closet and needed somehow to keep things separated, organized, and accessible. These worked out GREAT.

Here they are stored away above my closet:

I have one for crochet quilts, one for off-season Queen sheets for Jack’s bed, and one for a spare Queen duvet, spare Queen summer sheets, and extra pillowcases. They are generously sized, have a clear window, and the zippers work perfectly.

HATED: Fixwal Clear Storage Bags: https://amzn.to/3NLcM4T

Source: Amazon.com

Don’t buy these – they are absolute crap! I put two pillows in one of these and immediately the zipper broke. So, I grabbed another one… that one broke too. Immediately! The four-pack cost $23 (double the other kind) and they are absolute trash. These were returned.

LOVED: PowerStrip with Flat Plug: https://amzn.to/41aT1qt

Source: Amazon.com

I have an absolute mess of plugs next to my bed for my iphone charger, iwatch charger, white noise machine, lamp, etc. Once we tidied up the rest of the room, it made this even more of an eyesore:

I found this flat plug power strip for $16 and it has an attractive cord, fits 4 outlets and 3 USP charger ports, and was easily to attach to the wall. LOVE IT!

I currently have everything plugged into the outlets, but can also utilize the USB ports for my iwatch and iphone. I just didn’t do it yet, because I’m traveling this weekend and don’t want to forget to grab the plugs when I go!

The Pocketful of Joules Favorites List

I went through my Amazon orders for the last couple years, as well as items I’ve recommended and made a special Pocketful of Joules Favorites List. If you click through and buy anything on the list, OR if you click through my list and then go elsewhere to make your needed Amazon purchases, I may earn a small affiliate commission. And I do mean small, but it does add up over time to help pay for the annual blog hosting fees I pay.

If you’re planning on shopping anyways, I’d really appreciate it!

You can find the Pocketful of Joules Favorites List here: https://amzn.to/3s6voAn Every single thing on the list is something that I currently own, use and would recommend. If you have any questions about individual item recommendations, just let me know and I’ll give you my feedback!

Disclaimer: This post contains Amazon affiliate links. This means that clicking on a link may help me earn a small commission at no cost to you.

Kitchen Backsplash DIY: Using Peel and Stick Tile

After I did my little coffee bar refresh, I was still feeling bored with my kitchen. It just felt kind of dark and drab… where I wanted it to feel light and clean. When we moved in a decade ago, I had applied a peel-and-stick backsplash… so I decided for fun to rip the whole thing off and put a new one up.

Because that’s my idea of fun.

One of the questions I got on Instagram when I was posting about this project was: did I consider doing REAL tile and grout. And yes, I did consider it. However, I didn’t want to hire out the job and I don’t feel super confident in my tiling/grouting ability. So I decided to do peel-and-stick again, but a much FANCIER version.

So, what did I use?

The KASARO Peel and Stick backsplash in white hexagon (find them on Amazon here). When I purchased the tile, the cost was $29.99 per 6-sheet box. I purchased 6 boxes to make sure I had plenty, since at the time the Amazon link said it was running low. I ended up only using 4 boxes, so I returned 2. I have 5 sheets left, so I barely needed the 4th box… so I have some sitting around in case inspiration strikes.

Here is what I used on the project:

I had all the tools sitting around (including a fresh pack of razor blades), so this entire project cost me $120 in tile and about $10 for a tube of caulk.

Unlike my last experience with peel-and-stick, this is an aluminum metal composite rather than a rubbery sticker. The tile is much stronger than the previous version, and is more “real” in that it is actual metal tile with a better hand-feel and extremely sticky backing. The difference between this and real tile, is that it sticks right on and no grout is needed. However, get your tile lined up the first time because HOLYMOLY is the adhesive strong!

Here is our old backsplash I put up in 2012:

Once I removed the old backsplash (it just took a hairdryer, a spackle knife and some pulling action), I sprayed some degreaser and wiped down the white melamine backing that was left by the previous owners. Once it was dry, I started laying out my tile pieces. Obviously, I wasn’t lucky enough that a sheet exactly fit my spacing, so I measured out cuts for the top and bottoms of my sheets.

Since the tile is metal, you can’t just cut through it with a pair of scissors. Instead, I used a combination of a level (to measure and as my straight line guide), a fresh razor knife, a pencil and a pair of pliers.

I would mark my exact measurement, go over it 2-3 times with the razor knife, and then clamp on the pliers and snap it on the edge of the table. For every. Single. Hexagon.

My hands were SO TIRED after this project.

Once I had my perfect-sized shape, I’d take off the backing, carefully line it up on my wall, and stick it on. And of course, I’m a perfectionist… so I did the little-bitty points even though only people Jack’s size can see under the upper cabinets.

I ended up covering over our old phone line and cable line — I just took the switch plates off and shoved the wires back into the wall. Cutting around the remaining outlets wasn’t difficult, I just held up the pieces of tile and mapped out where I needed to snip a little:

I worked my way around the entire kitchen and when it was all finished, I grabbed a tube of caulk and did a nice line of white silicone around all the edges. This really took the project from ‘looks okay’ to ‘looks professional’… so I highly recommend caulking as a last step!

Before caulk:

After caulk:

I wasn’t keeping track of exactly how long the project took me, but thankfully the progress photos I took are time stamped. According to my phone, I spent about 3 ½ hours on Saturday night and then about 8 hours on Sunday. Which means the full project took me about 11 ½ hours.

Here’s the “after” for $130 in supplies and 11-ish hours of work:

I am so thrilled with the result!

Disclaimer: This post contains an Amazon affiliate link and ShopStyle affiliate links. This means that clicking on the link may help me earn a small commission at no cost to you