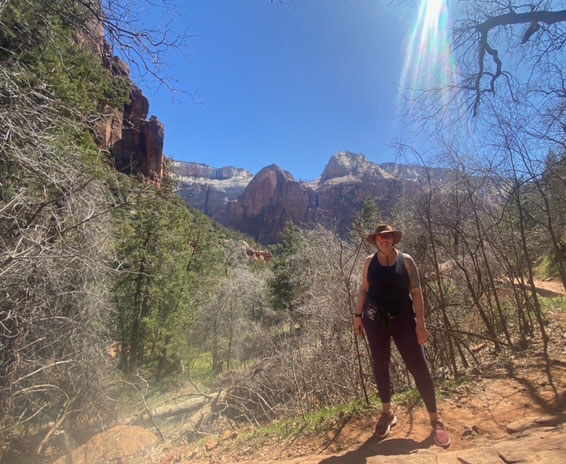
I consider myself a master-level packer when it comes to vacation packing. I consider it a ‘win’ if I wear everything in my suitcase, so I spend time fully planning out everything I think I might need or wear when I have a trip coming up. Our latest Spring Break adventure was no exception and after our week of hiking, e-biking and lounging, I came away with 5 workhorses from my trip.
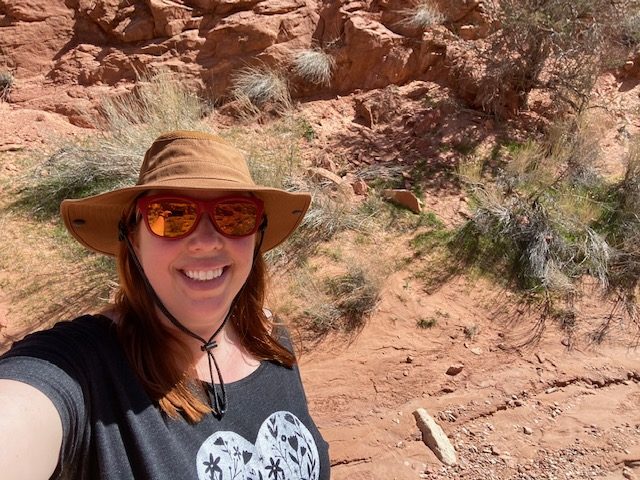
I really wanted a hat to wear while hiking and exploring that would protect me from the sun. This hat from REI is durable, breathable and has UPF 50+ sun protection. Not only is this important on our active vacations, but I’m also planning to use this all spring and summer when I’m out and about.
I tried on a bunch of hats and this one was my absolute favorite. I like that it has vents at the top and an adjustable chin strap for windy weather. I typically overheat in baseball caps, so it was a pleasant surprise that this one was so well ventilated. I also really like the Walrus Brown color, which to me looks like a clay orange.
I purchased these sneakers a couple years ago and they are my ‘go to’ sneaker for hiking. They are super comfortable and the merino wool is super breathable. One of the main reasons I brought them on our hiking trip is that they are machine-washable, so when they get covered in dirt or that red clay from Arizona, I just throw them in the washing machine afterwards.
A hidden benefit that I didn’t even realize – the sock-like top of the shoe keeps sand out! Both Travis and Jack had to shake out their shoes when we hiked over a sandy wash, and I was good to go.
I brought a few pairs of leggings on our trip, including a pair of Salutation Stash 7/8’s and a pair of Salutation Stash capris. Yes, Athleta leggings are pricey ($109 for full length), but they are my absolute favorite because they hold up perfectly over repeated wearings, washings, shoving things in the pockets, and even sliding my butt over rocks on a hike. They are thick enough to smooth any lumps and bumps, but thin enough that I don’t overheat.
After a full day, I just throw them in the washing machine on cold and then hang them to dry. By the next day, they’re back on my body and looking as good as new.
I actually own two of these lightweight sweatshirts – one in green and one in navy. I bought the first one on sale a year or two ago, so when I saw the green on clearance a few months ago I scooped it up. This is the PERFECT layer to add over pretty much anything – an exercise bra, a tank top, or a full t-shirt.
It is super lightweight and soft and has extra long sleeves with thumb-holes. It works great for a hike, with a pair of jeans for dinner, or tied around your waist when you get a little warm. I’m typically a true-to-size large, and I like this in a XL for a little extra comfy feeling.
This is a year-round product, but definitely one you should not forget if you are out and about in the sun. I’ve been using Supergoop SPF since early 2022 and it is my absolute favorite because it goes on totally invisible with not even a hint of greasiness or white cast. It has no scent, doesn’t irritate my contact lenses and works great under makeup too. It is a 100% winner in my book and one tube lasts a surprising amount of time before you need to re-order.
Disclaimer: This post contains Amazon and ShopStyle affiliate links. This means that clicking on a link may help me earn a small commission at no cost to you.
For the past few years, I’ve been using the same shampoo, conditioner and deep conditioning mask. They’ve all worked great and I’ve been happy with my hair. But suddenly they are just not working like they used to. I don’t know, my hair just feels kind of sad and limp. And maybe not as healthy as it previously did? I don’t know, life has been hard and I need a new shampoo to fix all my problems.
Here’s what I’ve been using since around October 2020: Olaplex No.4 shampoo, Olaplex No.5 conditioner, and Moroccan Gold Series Treatment Mask.
After years of working fantastically, when I opened a re-order of the Moroccan mask it seems like they’ve changed the formula and it doesn’t work as well. And since I’m towards the bottom of both Olaplex bottles, I feel like I need to date around a little before re-committing to $28 per bottle.
According to my hair stylist, my hair is fine but I have a lot of it. Also, my hair tends to lean more dry and is color-treated with me dying it at home every 8-9 weeks.
I started by googling ‘best shampoo and conditioner for fine, dry, color-treated hair’ and then when I’d see a potential match, I’d internet stalk for the reviews. Finally, after gathering a ton of information, I hit up my local TJ Maxx and Ulta to grab a few options to try:
JVN
The only reason I even know about JVN is that Elyse Myers raved about JVN products at some point and that stuck in my head and influenced me.
JVN Undamage Strengthening Shampoo – $21 on Amazon, but I found it for $10 at TJ Maxx. Key benefits: gently cleanses, good for over-processed hair, minimizes split ends.
JVN Embody Volumizing Conditioner – $21 on Amazon, but I found it for $10 at TJ Maxx. Key benefits: adds thickness and fullness to limp strands, restores softness and shine.
Pureology
Pureology Hydrate Sheer came up again and again when I was googling for the best shampoo for fine, dry, color-treated hair. I didn’t want to commit to a full bottle, so I went to Ulta to buy travel-sized versions.
Pureology Hydrate Sheer Nourishing Shampoo – $35 for full size on Amazon, but I bought the trial size for $11 at Ulta. Key benefits: specifically for dry, fine hair and restores suppleness to color-treated hair.
Pureology Hydrate Moisturizing Conditioner – $36 for full size on Amazon, but I bought the trial size for $11 at Ulta. I WANTED to buy the Hydrate Sheer conditioner to match the shampoo, but they didn’t have it. So I bought the next best thing, the regular hydrate. Key benefits: provides moisture, softness, and protection for dry and color treated hair. The hydrate sheer is for fine hair and the hydrate is for medium to thick hair.
Joico
The brand Joico also kept coming up in my google searches, so I was thrilled to find it at TJ Maxx!
Joico HydraSplash Hydrating Shampoo –$42.50 on Amazon, but I found it for $10 at TJ Maxx. Key benefits: adds hydration and softness to fine-to-medium, dry hair. Will not weigh it down. Has crazy good reviews on Amazon.
Joico JoiFULL Volumizing Conditioner – $24 on Amazon, but I found it for $10 at TJ Maxx. Key benefits: for fine, thin hair. Adds instant body and long-lasting fullness. Boosts shine. Also has excellent reviews.
I’m going to take turns with each brand and give them a try for a week or so each. I’m very much hoping I find a new favorite. Going on reviews alone, I have high hopes for all three of the brands… so I’ll be sure to check in and let you know the winners.
Also, if you also have fine, dry, color-treated hair and you have a favorite shampoo and conditioner, please let me know so I can add it to my list!
Disclaimer: This post contains Amazon affiliate links. This means that clicking on a link may help me earn a small commission at no cost to you.
Everything you might possibly want to know about my Broadband Laser (BBL) Treatment. {NOTE: This is NOT about a Brazilian Butt Lift. Both are called BBL… but the one I’m talking about resurfaces your face and doesn’t make your booty pop} Before I did my treatment, I looked EVERYWHERE to try to determine what the different phases would look like and found very little information. So, I made sure to take a ton of photos so that I could show you EXACTLY what my face looked like directly after BBL, 1 day later, 1 week later, and 3 weeks later.
Let’s start at the beginning… or at least the mid-80’s. Back in the old days when I was a kid, we were not very good about using sunscreen. In fact, many people were doing the baby-oil-and-fry method to try and get a deep, dark tan. I was on swim team during the summer, so every day I’d get to the pool in the morning for team practice and then just kind of hang out the rest of the day.
All. Summer. Long. So, my hair was super bleached and my skin was super tan.
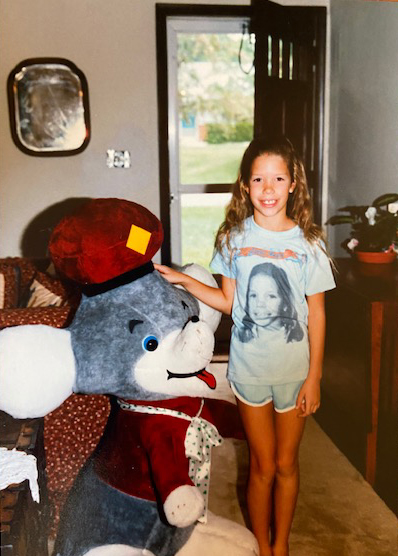
Is this an excuse to post this ridiculous photo of me wearing a shirt with a photo of me on it again? Perhaps.
Which, I understand can be hard to believe considering I’m so pale nowadays that that I buy face powder in the pretty much the lightest shade out there.
Anyways, throughout the years I noticed myself getting more and more freckly. At least, I thought they were freckles until a *nice* blog reader pointed out my sun spots and offered to send me a multi-step treatment from their MLM for me to review back in 2016.
Spoiler alert: it didn’t work. So now I knew I had sun spots AND that they weren’t going anywhere. Cool. I wasn’t super fixated on the sun spots, but I didn’t love them. I just kind of figured I was stuck with them, so I tried to ignore them.
Fast forward to 2022. I signed up for a 6-month membership at a nearby medi-spa because I wanted to add monthly facials to my self-care routine. While attending the spa, I learned about their BBL (Broadband Laser) treatment because members received 10% off. The nurse who did the treatments and I spoke a couple times and she felt very sure that one session would be all I would need, since my spots were relatively mild. So, when they had a ‘open house’ special in the fall I pre-paid for one session of BBL for around $300.
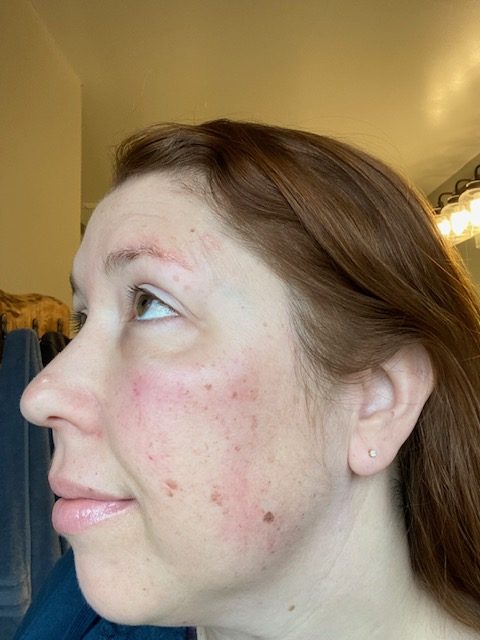
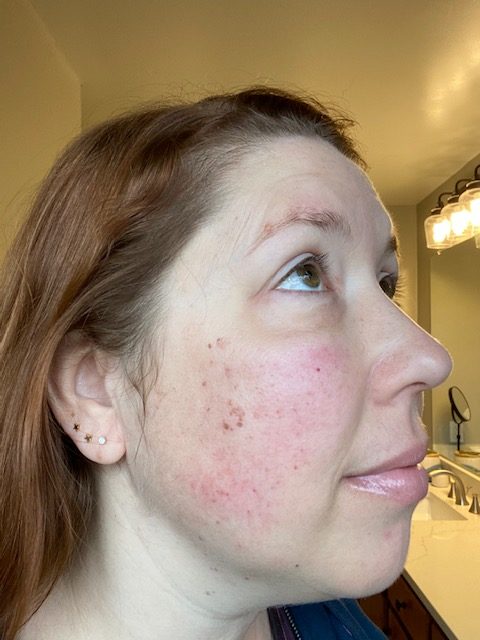
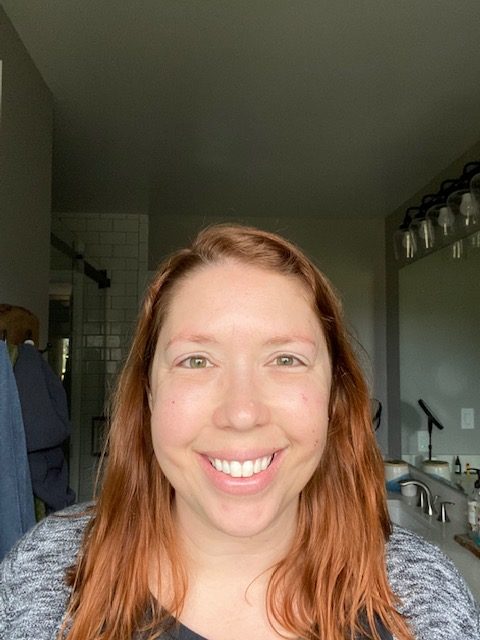
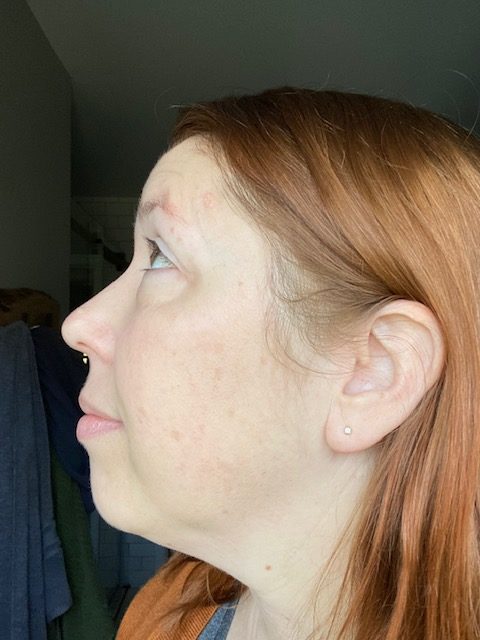
I waited until the middle of winter to make sure that I was at my most pale version of myself, to make it easier for the laser to focus on those dark spots.
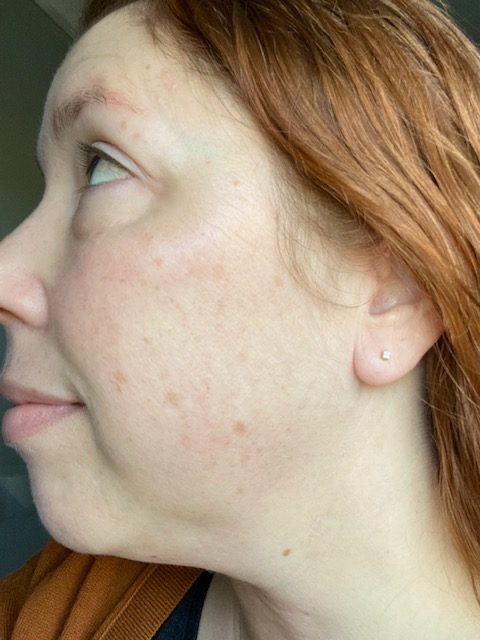
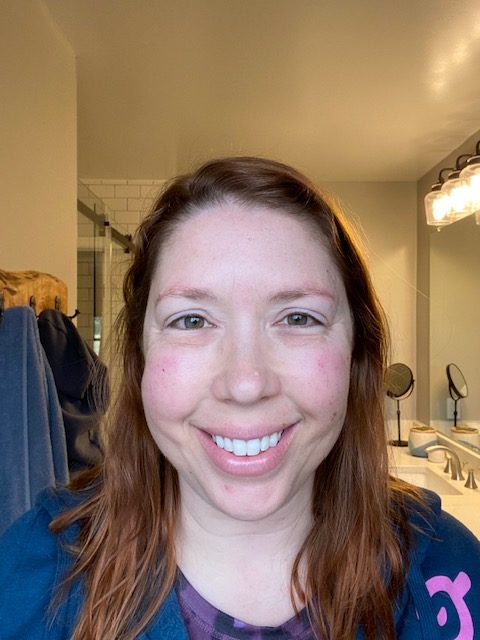
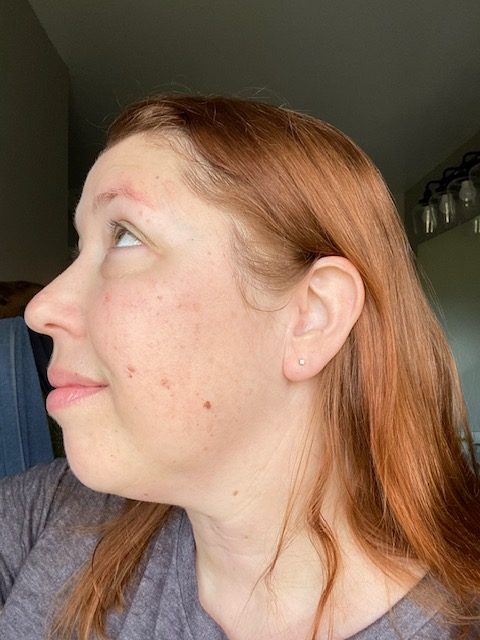
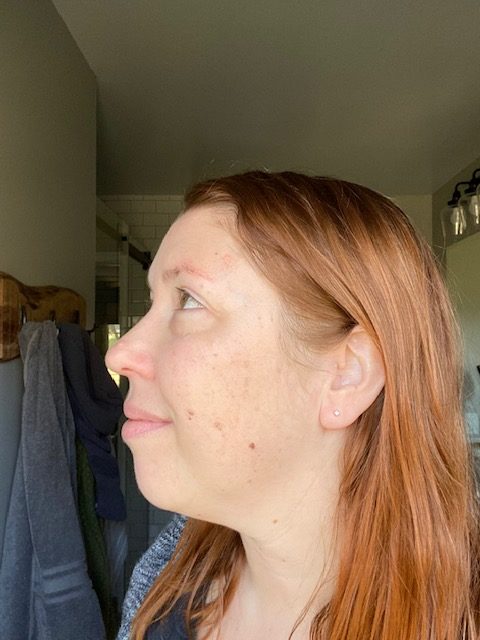
Here is my “before” from February 14, 2023:
{PS to see any photo from one of these photo collages as a larger image, just click on it}
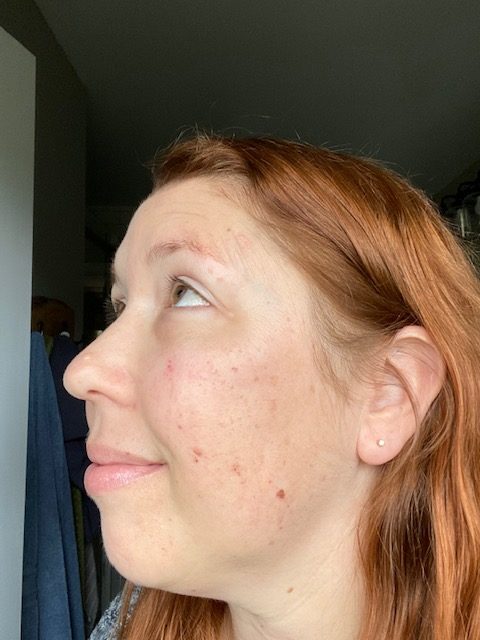
The ones I was most concerned about were these:
Yes, that looks like a paw print. Right?! Anyways, it’s typical for your left side to have more sun spots due to driving around with the sun hitting your window.
Based on the nurse’s feedback, I was hoping for a total obliteration of the sun spots. But, being a realist, I was really hoping for general improvement.
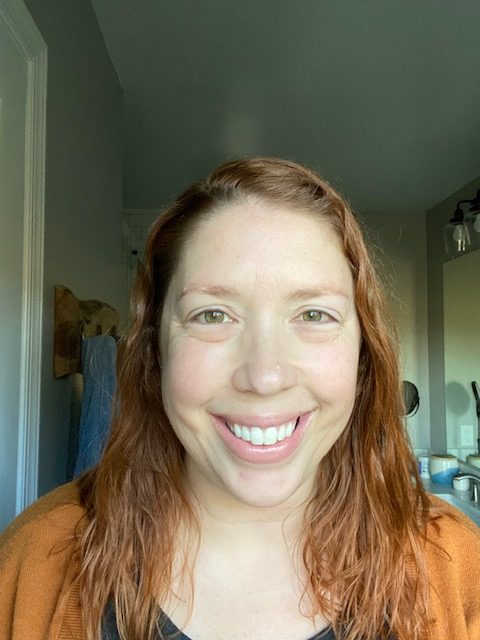
A note about the bazillion photos I’m about to include. I’m not wearing any makeup on my face (other than occasionally on my eyelids). I did not edit anything in photoshop, other than to include collages and text. I used natural light from my bathroom window for each photo, so if there are inconsistencies it is due to that day’s weather.
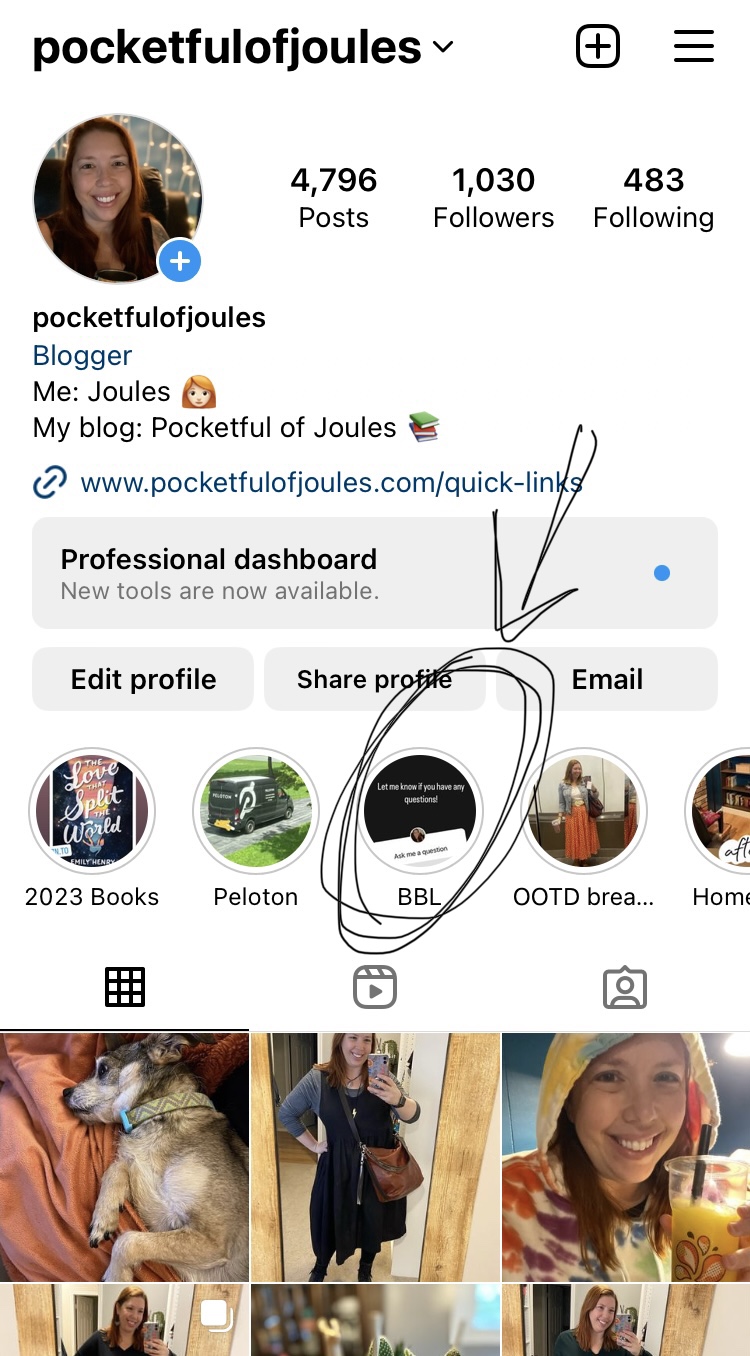
Also, I wanted to include more of my videos but they were too large to send/upload. So if you’d like to see all my video check-in’s, go to my Instagram page where I linked them all under the BBL bubble.
Let’s get into it!
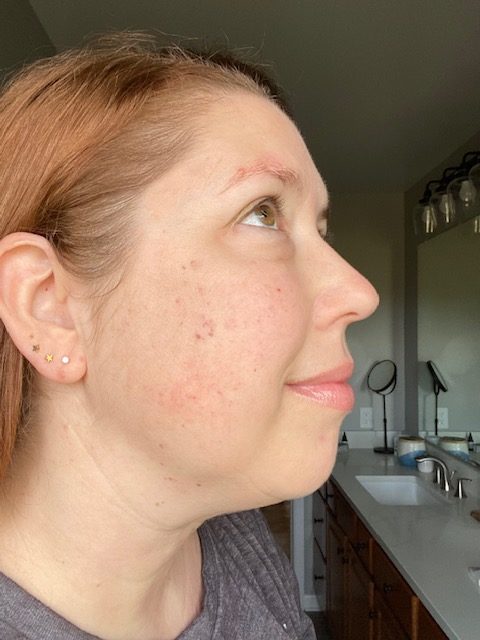
BBL 30 Minutes After – February 15, 2023:
Questions I’ve gotten:
What did it feel like/did it hurt?
I would describe it as uncomfortable, but not painful. They put a goopy jelly on your face and little goggles over your eyes. Then, they rub the machine over different areas of your face and there is a quick ZAP and bright light. I found the sounds/light/feeling more of a startling sensation than painful. The nurse said it was similar to a tattoo, but I absolutely do not agree. My whole session probably lasted around 20-30 minutes from start to finish. She went over my face with different strengths of the laser and hit all the different areas multiple times.
How much did it cost?
The medi-spa I went to typically charges $395 for a session, or a bit less for a three-pack. However, I waited until they had their fall open house and pre-paid for my one session. I’m pretty sure it was right around $300. I am not sharing the name of the medi-spa online. If you are local to Maryland, feel free to email or DM me and I’ll pass through that information.
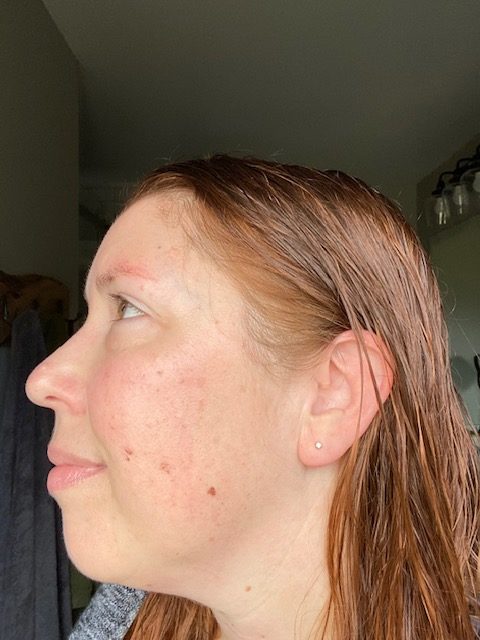
BBL 1 Day After – February 16, 2023:
The next day, my face was red, blotchy and swollen. The sun spots were starting to get much more brown. I totally had some chipmunk cheeks, but I wasn’t in pain at all.
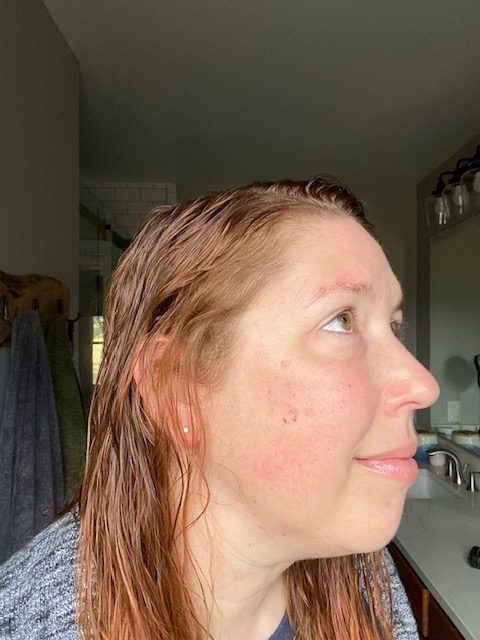
BBL 2 Days After – February 17, 2023:
On day 2, my face was no longer red, blotchy or swollen. No chipmunk cheeks, yay! However, the sun spots were getting even more brown.
BBL 3 Days After – February 18, 2023:
BBL 4 Days After – February 19, 2023:
BBL 5 Days After – February 20, 2023:
BBL 6 Days After – February 21, 2023:
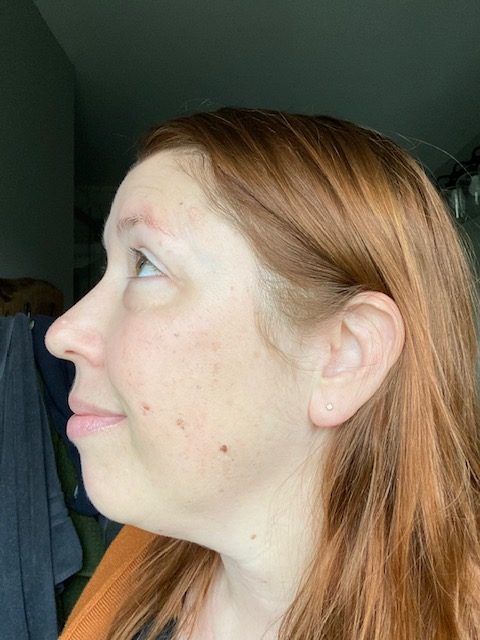
BBL 1 Week After – February 22, 2023:
For my one-week check-in, I also gave an update on the video about what I had been doing to my skin for the past week. Basically, I was just moisturizing, moisturizing, moisturizing!
Starting on the evening of day 6, I also started using my night-time exfoliant to help with the skin turnover process. My esthetician started me on this in August and I LOVE IT: Bioelement Skin Editor. It is a leave-on AHA peel cream exfoliator that has 3% glycolic and 7% lactic acid. I usually use it every other night and it makes my skin absolutely glow. (First face wash, then Vitamin C serum, then Skin Editor, then night cream).
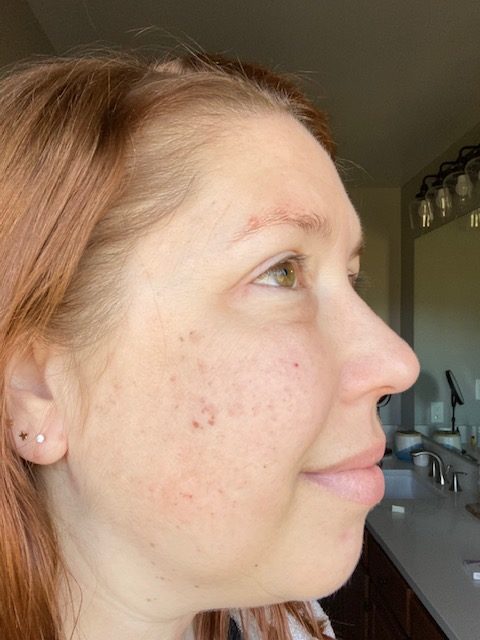
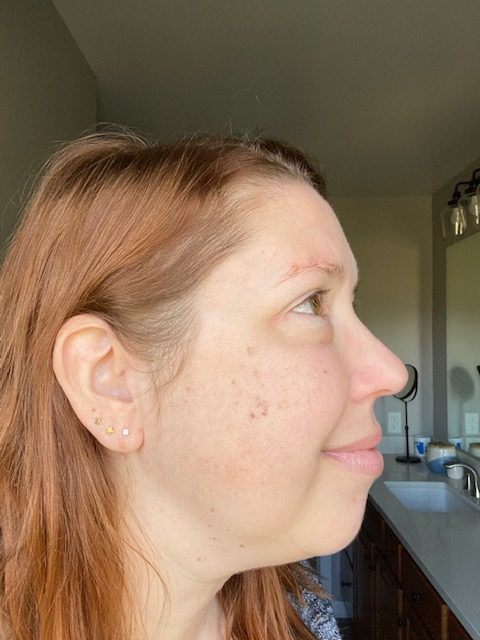
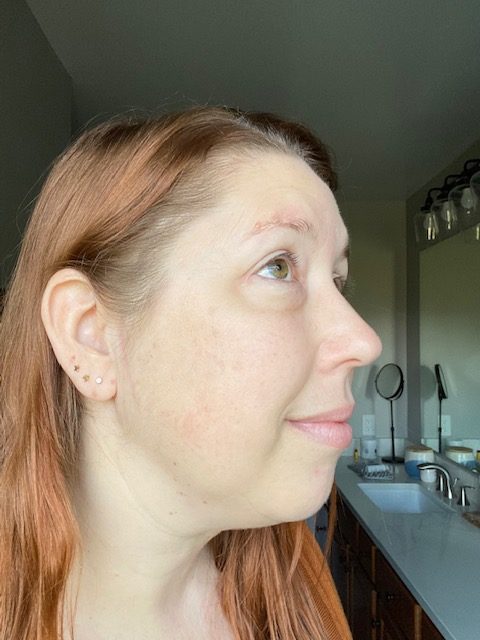
BBL 2 Weeks After – March 1, 2023:
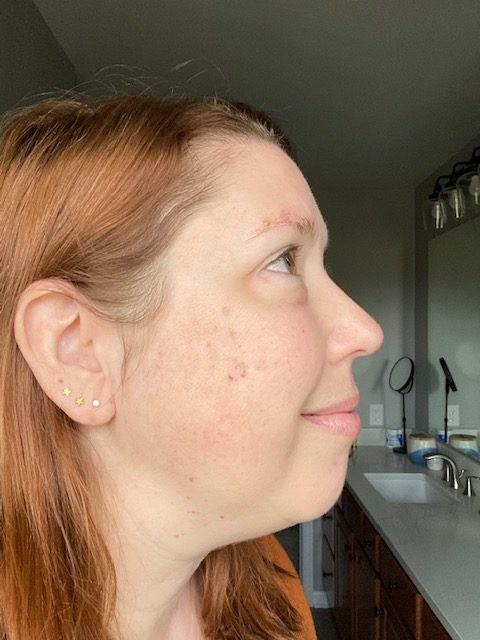
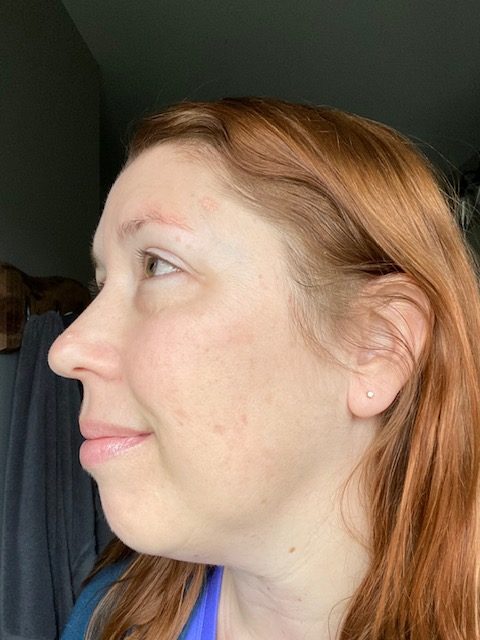
BBL 3 Weeks After – March 10, 2023
I was actually really surprised to see continued improvement between week 2 and week 3. I had figured that after the brown spots fell off, that would be as good as it would get… but I’m seeing continued improvement.
In fact, when I went to my esthetician for a facial the following week she said I’ll see even more improvement over the next couple months as my skin cells turn over. I’m actually very happy with the improvement in my skin, so to know that it will continue to improve has me really excited!
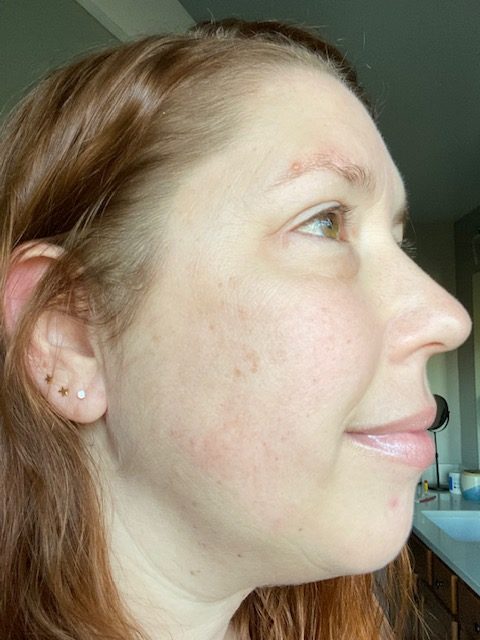
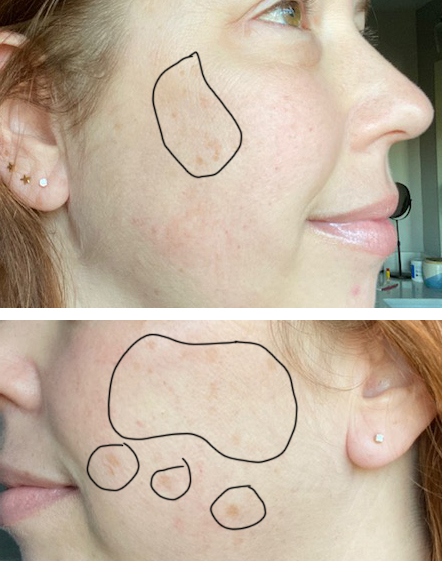
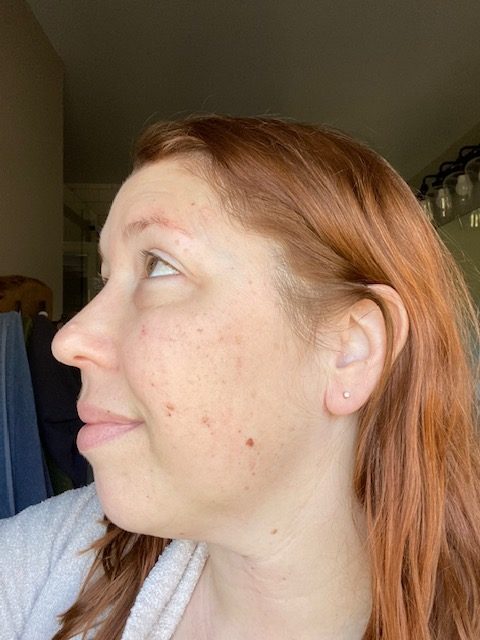
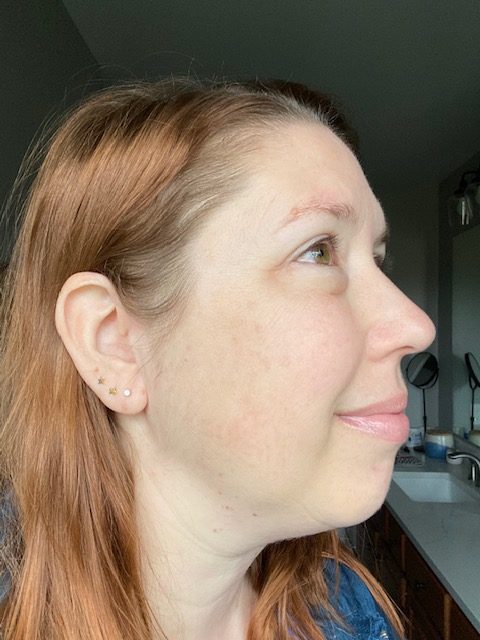
Here is my before photo again, compared with my “after” at the 3 week mark.
Right side:
I’m super happy with the improvement to the right side of my face. Most of the sun spots are very much reduced and the skin on my cheek is overall much more even with a smoother color.
Left side:
I’m happy with the improvement on the top of my left cheek, but those three stubborn spots towards the bottom are still there. I’m crossing my fingers for a little more improvement over the next month or so. With that being said, I’m not unhappy enough to want to do (or pay for) a second BBL session.
As for now, I’m just continuing to take care of my skin. I listed my products above, and I use them regularly. I also use sunscreen on days that I leave the house and have purchased a hat for extra sun protection.
Perhaps I should do another update in May to see if there has been more improvement?
All in all, I’m very happy with my BBL experience for sun spots. The one session gave me a noticeable improvement within the first month, the pain was very slight, and the down-time was minimal.
Let me know if you have any other questions!
Disclaimer: This post contains Amazon and ShopStyle affiliate links. This means that clicking on a link may help me earn a small commission at no cost to you.